
![]()
Beginner’s Guide to Getting Started with Arduino
Howdy everyone! In this post, we’re going to help you get started with a very creative combination of Hardware & Software called Arduino.
What Is Arduino?
According to the Arduino official website:
“Arduino is an open-source electronics platform based on easy-to-use hardware and software. Arduino boards are able to read inputs – light on a sensor, a finger on a button, or a Twitter message – and turn it into an output – activating a motor, turning on an LED, publishing something online. You can tell your board what to do by sending a set of instructions to the microcontroller on the board. To do so you use the Arduino programming language (based on Wiring), and the Arduino Software (IDE), based on Processing.”
Read more here: https://www.arduino.cc/en/Guide/Introduction
The Arduino project started in 2005 in Italy by founders: Massimo Banzi, David Cuartielles, Tom Igoe, Gianluca Martino, and David Mellis inspired to make a low-cost and simple solution for non-engineers to create digital projects.
Wikipedia has more details on it here: https://en.wikipedia.org/wiki/Arduino
Personally, I love the fact that Arduino was named after the bar where the founder used to meet! I wonder what their favorite drinks are?
Without getting into too many details, you should know that one of the founders split off to create another Arduino company in 2008 with some drama, but recently (October 2016 – Would Maker Faire NYC) both companies announced they would merge back together!
Now, let’s get started with Arduino!
As mentioned earlier, Arduino is a combination of hardware and software. You will need both the Arduino IDE software application and an Arduino Hardware Board to start learning Arduino Programming, Coding, Prototyping and creating different IoT projects on it.
Let’s start with Arduino IDE software application.
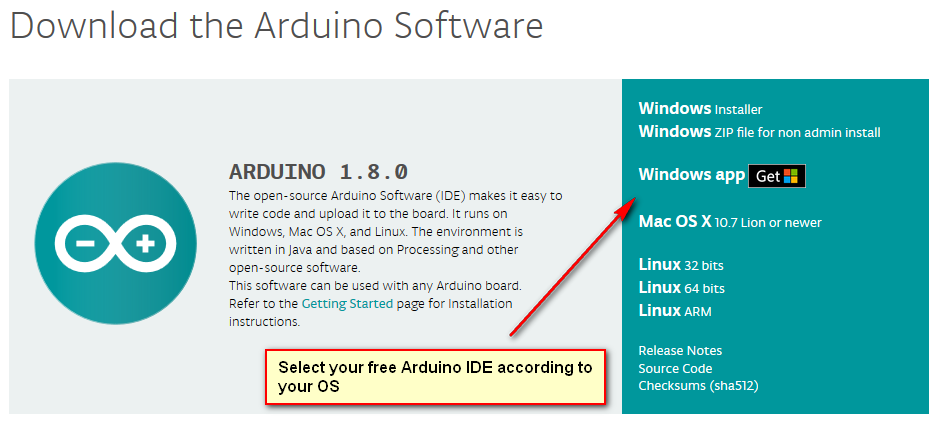
As of January 4, 2017, ARDUINO 1.8.0 is the latest version of Arduino IDE. You can download it for free by visiting this link to the official Arduino download page: https://www.arduino.cc/en/Main/Software
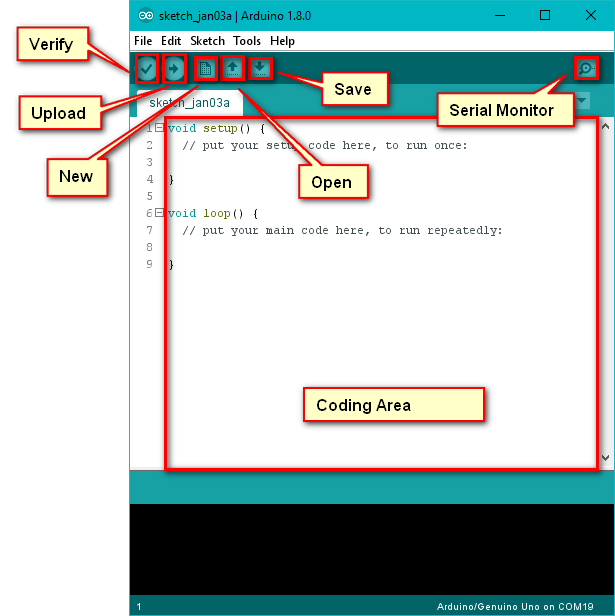
After downloading and installing the software, you can open and run the IDE. You will see the following window on your computer:
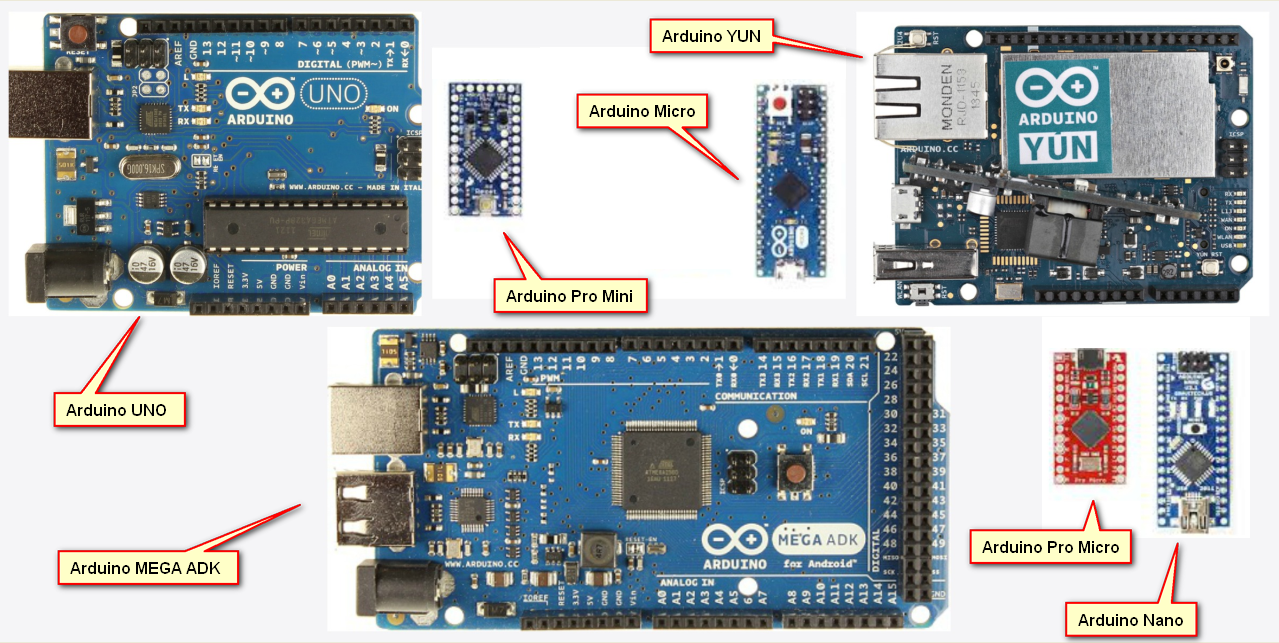
Now that we have the basic Arduino software set up and running, let’s talk about the hardware. The hardware is called an Arduino Board. There are different types of Arduino Boards made for different purposes.
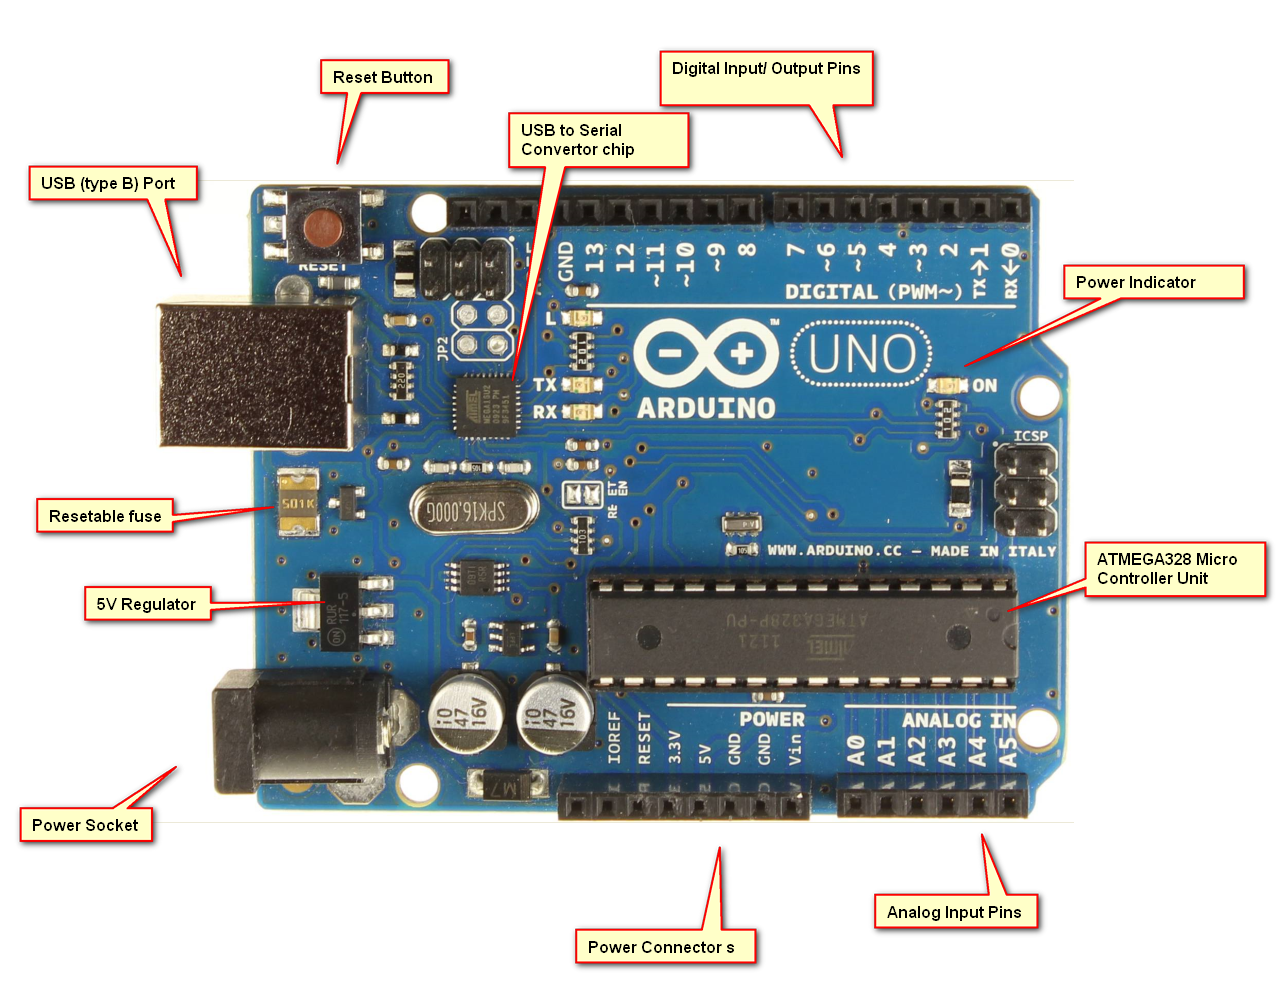
One of the best board for beginners is the Arduino UNO R3. The Arduino UNO R3 is very easy to use and has 20 input-output pins, clearly marked pin numbers and symbols, USB type-B port to connect with Computer and Power socket to provide external power (optional), and they are fairly cheap. It is compatible with most projects and code examples you will find on the internet.
Here you can see the different parts of an Arduino UNO.
 If you want to purchase an original Arduino board, visit the Arduino web store: https://store.arduino.cc/ or you can also purchase on Amazon(currently at $16USD)
No products found.
Adafruit also makes a nice version of the Uno called the Metro that we have used successfully on a few projects.

Arduino Hardware is Open-source, meaning anyone can clone, modify, or upgrade original Arduino Boards. If you want to buy a clone online, there are many available here on eBay.
Disclaimer: Most, if not all, the product links on this page will be Affiliate Links. Purchasing through these links doesn’t cost you any more money but it does help us pay for things like website hosting along with more bits & gadgets to write about.
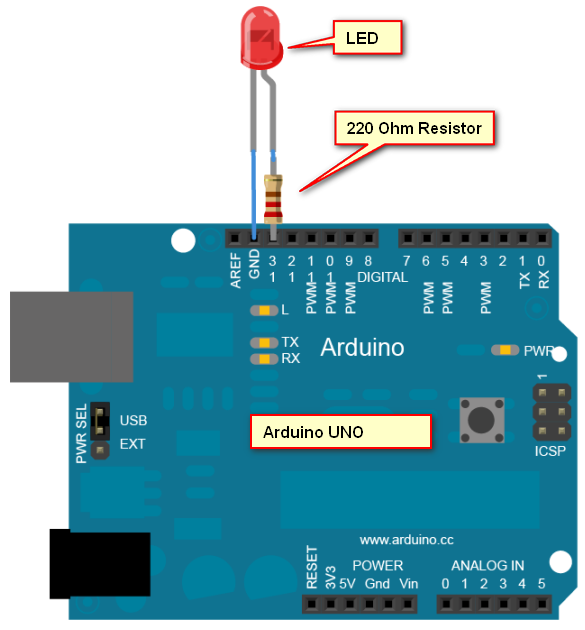
Now you have both the Arduino IDE installed and an Arduino UNO board, let’s see what you can make using this wonderful little board. Think you need to blink a LED bulb which turns ON for 1 second and Turns OFF for 1 second? So you can do it using an Arduino Board, LED and a 220ohm resistor hook up together as the following diagram illustrates. Cool!
One of the first project moist people do with their Arduino is called BLINK. In this project, you will blink a LED bulb which turns ON for 1 second and turns OFF for 1 second. The example illustration below uses an Arduino Board, an LED and a 220ohm resistor connected together. For our actual first project, though, we will just use the built-in led.
Now, let’s write and upload a simple program with the Arduino IDE(which we installed before). This is a simple Blink code to blink the Built-in LED common on the UNO, MEGA and ZERO.

/*
Blink
Turns on an LED on for one second, then off for one second, repeatedly.

Most Arduinos have an on-board LED you can control. On the UNO, MEGA and ZERO
it is attached to digital pin 13, on MKR1000 on pin 6. LED_BUILTIN takes care
of use the correct LED pin whatever is the board used.
If you want to know what pin the on-board LED is connected to on your Arduino model, check
the Technical Specs of your board at https://www.arduino.cc/en/Main/Products

This example code is in the public domain.

modified 8 May 2014
by Scott Fitzgerald

modified 2 Sep 2016
by Arturo Guadalupi
*/

// the setup function runs once when you press reset or power the board
void setup() {
// initialize digital pin LED_BUILTIN as an output.
pinMode(LED_BUILTIN, OUTPUT);
}

// the loop function runs over and over again forever
void loop() {
digitalWrite(LED_BUILTIN, HIGH); // turn the LED on (HIGH is the voltage level)
delay(1000); // wait for a second
digitalWrite(LED_BUILTIN, LOW); // turn the LED off by making the voltage LOW
delay(1000); // wait for a second
}
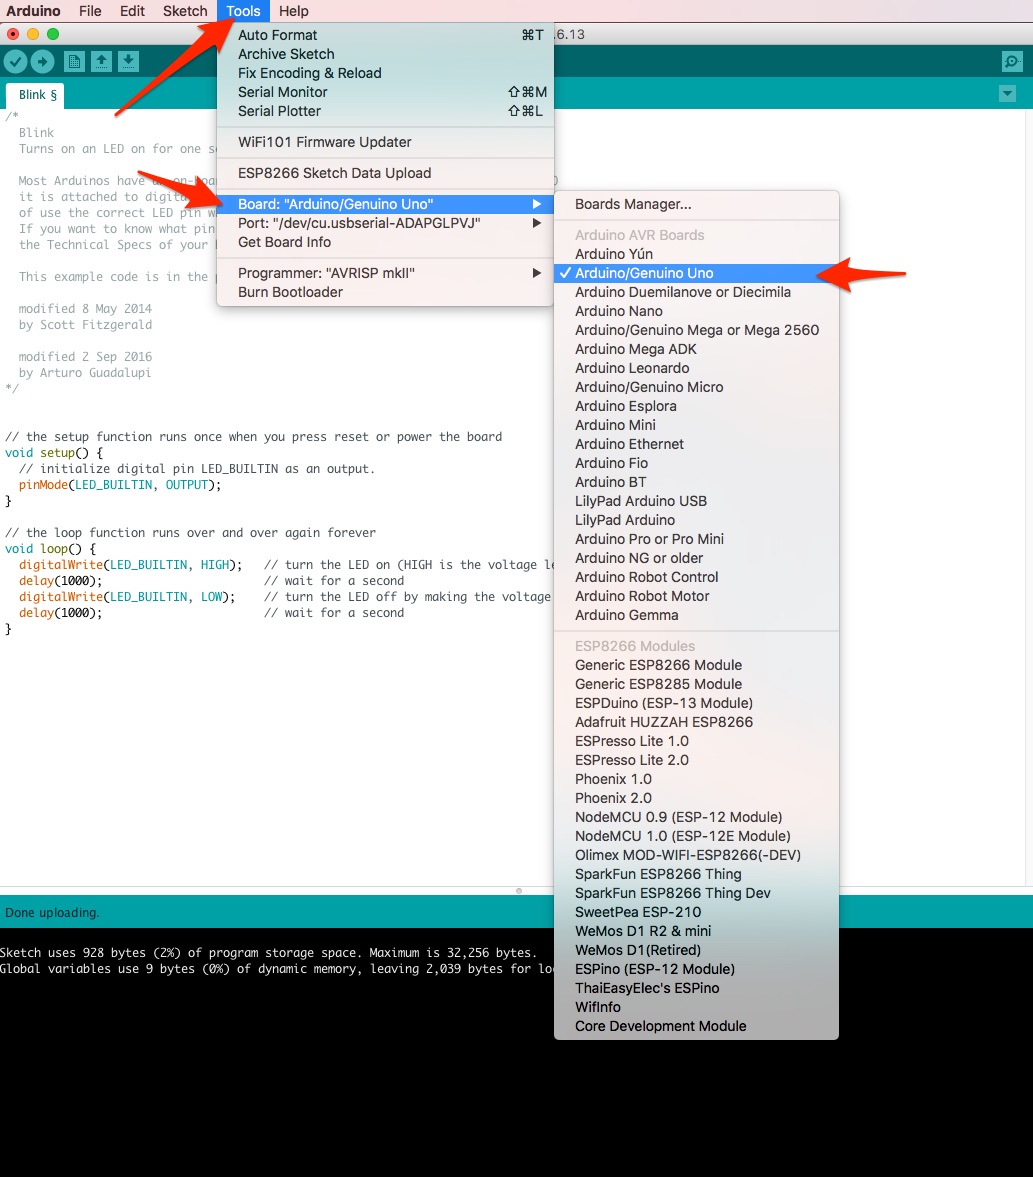
Before we can upload the program, we need to get our Arduino board and Port configured in the IDE.
First, Select Tools -> Board and click on the Arduino/Genuino Uno
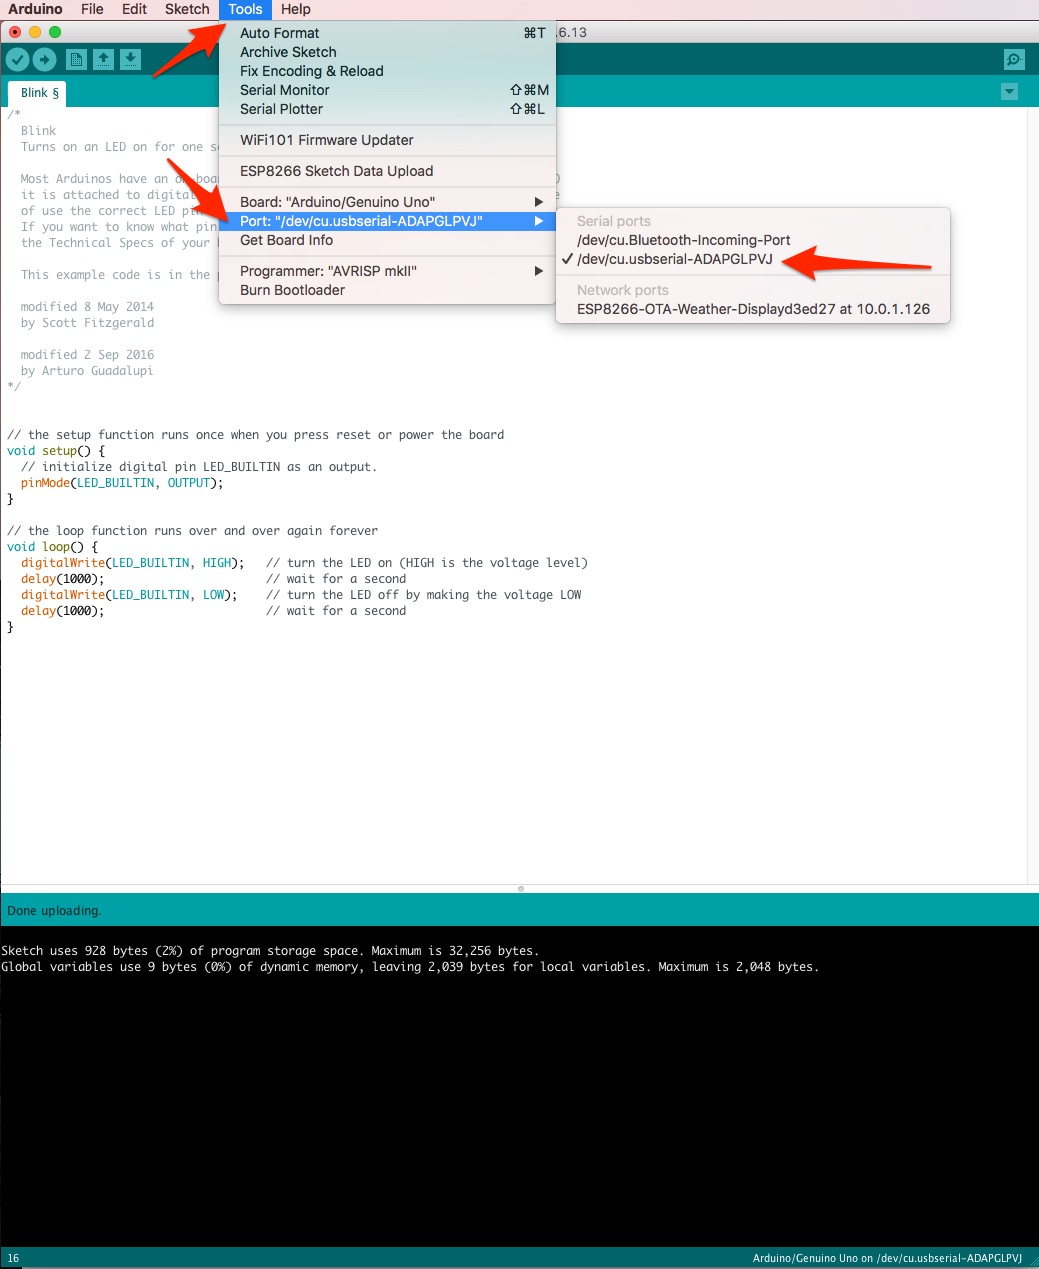
Next, select the proper USB Port which will usual contain the words “usbserial” depending on your Operating System.
Now you are ready to hit the upload button! This is commonly referred to as “Uploading the Sketch”
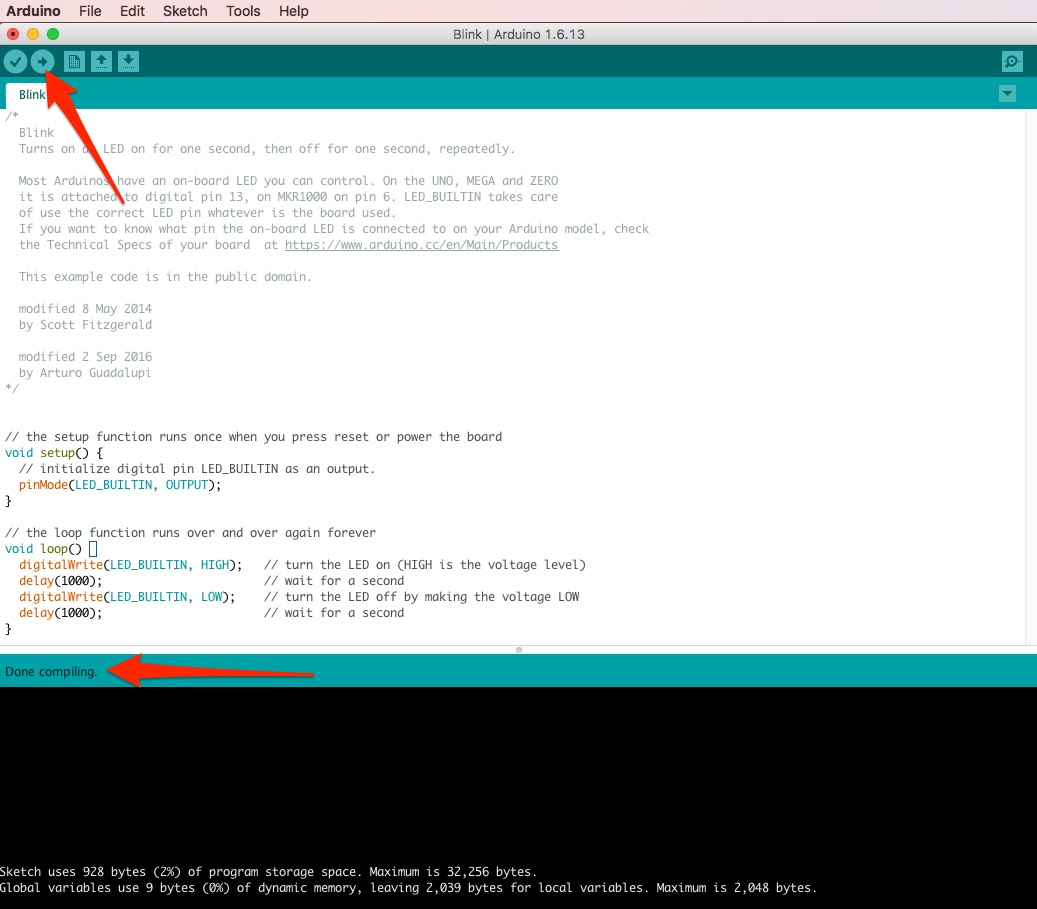
At this point, your Arduino light should be blinking on and off!
Great Success!
We will dive deeper into more advanced Arduino coding in upcoming tutorials.
Beyond Blinking LEDs with Arduino, you can drive motors, activate relays(allowing you to control high voltage equipment), read different sensors such as light, temperature, humidity, sound, pressure and more. Getting even more advanced, you can create and control robots, 3D printers, plotters, and make sounds using MIDI tones or using an SD card with Arduino. Additionally, you can control your home electronic devices via the Internet (Internet Of Things).
Stay tuned for more Arduino beginner tutorials.
Feel free to comment if you have any questions about this tutorial or if you have an Arduino project you want us to cover.
[ratings]
amzn_assoc_placement = “adunit0”;
amzn_assoc_search_bar = “true”;
amzn_assoc_tracking_id = “geekpi-20”;
amzn_assoc_search_bar_position = “bottom”;
amzn_assoc_ad_mode = “search”;
amzn_assoc_ad_type = “smart”;
amzn_assoc_marketplace = “amazon”;
amzn_assoc_region = “US”;
amzn_assoc_title = “Shop Related Arduino Products”;
amzn_assoc_default_search_phrase = “Arduino Uno R3”;
amzn_assoc_default_category = “All”;
amzn_assoc_linkid = “5f6e1e6f68cf542f1dcb4d11c754a28e”;