
You’ve been watching Jeff Geerling’s Raspberry Pi cluster builds on YouTube. You’ve seen NetworkChuck spin up virtual machines like they’re nothing. Maybe Techno Tim’s Proxmox tutorials finally pushed you over the edge. Now you want your own home lab, but you’re staring at a wall of options and wondering where to actually start.
I’ve been running home lab setups for years, from a single Raspberry Pi running Pi-hole to a full Proxmox cluster with multiple nodes. Here’s the thing nobody tells you upfront: you don’t need enterprise hardware to learn enterprise skills. A $200 mini PC can teach you more about networking, virtualization, and self-hosting than any online course.
This guide covers every realistic entry point for home labs in 2026, from $50 Raspberry Pis to $600 NAS devices. I’ll break down what each option is actually good for, because “best” depends entirely on what you want to learn.

Quick Picks
| Pick | Best For | Price Range | Top Choice |
|---|---|---|---|
| Best Overall for Beginners | Learning virtualization + Docker | $200-350 | Beelink SER5 MAX |
| Best NAS + Lab Combo | Storage-first with app hosting | $350-600 | Synology DS224+ |
| Best Ultra-Budget | First taste of self-hosting | $50-120 | Raspberry Pi 5 (8GB) |
| Best Performance Per Dollar | Serious multi-VM workloads | $150-300 | Used Dell OptiPlex Micro |
| Best All-In-One | Compact powerhouse | $350-500 | Minisforum UM790 Pro |
What Actually Matters in a Home Lab Server
Before you spend money, figure out what you want to run. This matters more than specs.
If you want to learn Docker and self-hosting: A mini PC with 16GB RAM and a decent CPU is all you need. Docker containers are lightweight. You can run Portainer, Jellyfin, Home Assistant, Nextcloud, Pi-hole, and a dozen other services on a single Beelink mini PC without breaking a sweat.
If you want to learn virtualization (Proxmox, ESXi): RAM is king. Each virtual machine needs its own chunk of memory. 16GB lets you run 2-3 small VMs comfortably. 32GB opens the door to a proper lab environment with pfSense, a Windows VM, a couple Linux servers, and room to experiment.
If you want network-attached storage first: Get a proper NAS. Synology and QNAP build purpose-built hardware with drive bays, redundancy, and management interfaces that make storage administration straightforward. Both now support Docker containers too, so you get a two-for-one.
Key specs to watch:
- RAM: 16GB minimum for anything beyond basic Docker hosting. 32GB if you want Proxmox with multiple VMs
- CPU: Anything from the last 5 years works. Intel N100/N95 for low power, AMD Ryzen 5/7 for performance
- Storage: NVMe SSD for the OS and apps. Add a SATA SSD or HDD for bulk data
- Ethernet: Gigabit minimum. 2.5GbE is common on newer mini PCs and worth having
- Power consumption: This thing runs 24/7. The difference between 15W idle and 65W idle is roughly $50-60/year on your electric bill
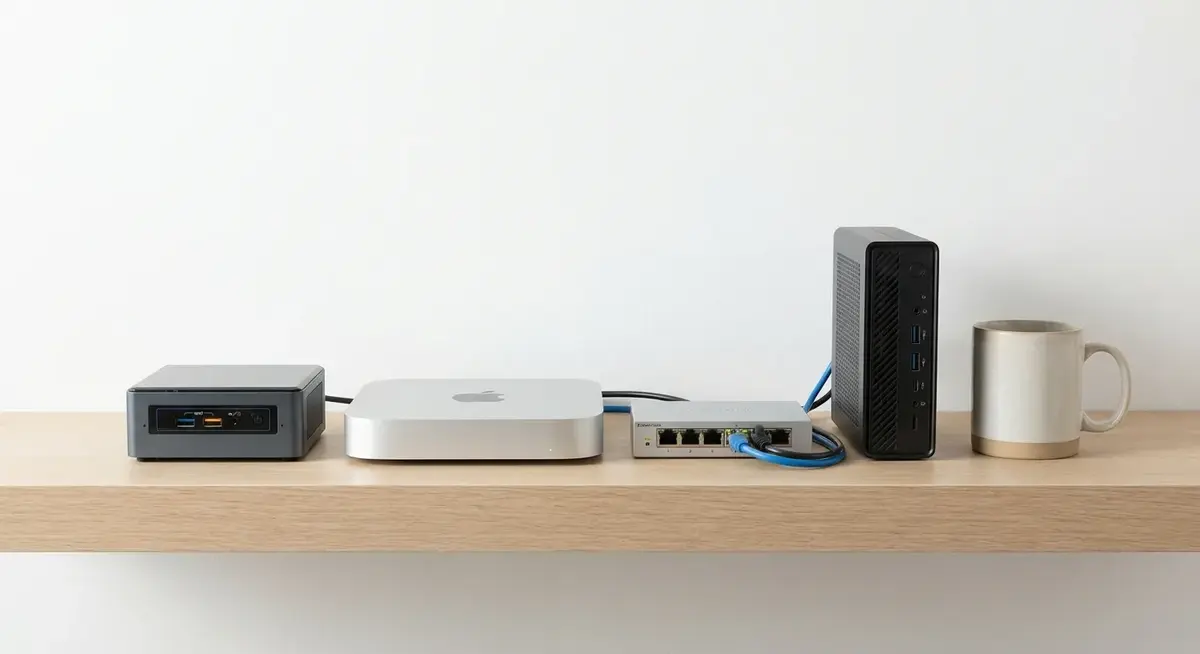
Best Mini PCs for Home Labs
Mini PCs have taken over the home lab scene. They’re quiet, tiny, power-efficient, and surprisingly capable. The Intel NUC line that started this trend got discontinued by Intel in 2023, but ASUS picked up the NUC brand and competitors like Beelink and Minisforum have filled the gap with better options at lower prices.
Beelink SER5 MAX (AMD Ryzen 7 5800H) — Best Overall Starter
The Beelink SER5 MAX is the home lab starter I recommend most often, and it’s what I’d buy today if I were starting from scratch. The Ryzen 7 5800H gives you 8 cores and 16 threads, which is more than enough for a dozen Docker containers or 3-4 Proxmox VMs running simultaneously.
Specs:
– AMD Ryzen 7 5800H (8C/16T, up to 4.4GHz)
– 32GB DDR4 3200MHz (dual channel, upgradeable)
– 500GB NVMe SSD (M.2 2280 slot)
– 2x HDMI, USB-C, 4x USB 3.2, 1x USB 2.0
– Gigabit Ethernet + WiFi 6
– ~35W typical power draw
– Dimensions: 4.9” x 4.5” x 1.5”
Price: Beelink SER5 MAX 32GB/500GB — around $310-350
The 32GB RAM configuration means you can install Proxmox and start spinning up VMs without immediately hitting memory walls. I’ve seen people run Proxmox with TrueNAS in a VM, a Docker host VM, and a pfSense firewall VM all on this hardware without issues. That’s a complete lab environment in a box the size of a paperback book.
The fan can be audible under sustained load, but at idle it’s nearly silent. Fine for a closet or desk shelf. If noise bothers you, the BIOS has fan curve settings you can adjust.
What Techno Tim would say: Tim has featured Beelink mini PCs in several Proxmox build videos and consistently praises the price-to-performance ratio for home lab use. His Proxmox beginner guide is the best resource for getting started with virtualization on hardware like this.
Minisforum UM790 Pro (AMD Ryzen 9 7940HS) — Best Compact Powerhouse
If you want more headroom than the SER5 MAX and don’t mind spending an extra $100-150, the UM790 Pro is the step up. The Ryzen 9 7940HS is a current-gen chip with significantly better single-threaded performance and integrated Radeon 780M graphics (useful if you want to experiment with GPU passthrough for a Windows VM).
Specs:
– AMD Ryzen 9 7940HS (8C/16T, up to 5.2GHz)
– 32GB DDR5 5600MHz (dual channel)
– 1TB NVMe SSD (plus second M.2 slot)
– 2x HDMI 2.1, USB4 (40Gbps), 4x USB 3.2
– 2.5 Gigabit Ethernet + WiFi 6E
– ~45W typical power draw
– Dimensions: 5.0” x 5.0” x 1.9”
Price: Minisforum UM790 Pro 32GB/1TB — around $450-500
The 2.5GbE networking is a genuine advantage here. If you’re running NFS shares or transferring large files between VMs, that extra bandwidth adds up. The USB4 port also opens the door to external NVMe enclosures if you want fast external storage without cracking the case open.
The UM790 Pro also has DDR5, which matters for memory-intensive workloads. If you’re planning to run something like a local LLM (Ollama with a 7B model) alongside your regular lab services, the faster memory bandwidth helps noticeably.
ASUS NUC 14 Pro (Intel Core Ultra) — The Brand Name Pick
ASUS took over the NUC brand from Intel, and the NUC 14 Pro is their current lineup. These are solid machines, but you’re paying a premium for the NUC name. The Core Ultra processors offer decent performance and excellent power efficiency, and the Thunderbolt 4 port gives you expansion options that the Chinese mini PCs can’t match.
Specs (NUC 14 Pro, Core Ultra 7 155H):
– Intel Core Ultra 7 155H (16C/22T)
– Up to 96GB DDR5 (2 SO-DIMM slots, sold barebones)
– M.2 2280 NVMe slot
– Thunderbolt 4, HDMI 2.1, 2.5GbE
– vPro support (remote management)
– ~28W typical power draw
Price: ASUS NUC 14 Pro — $450-550 barebones (add your own RAM and SSD)
The vPro support is actually relevant for a home lab. It gives you remote management capabilities similar to enterprise IPMI/iDRAC, meaning you can reboot and manage the machine remotely even if the OS crashes. That said, for most beginners, the Beelink at half the price makes more sense.
Best NAS Devices for Home Labs
A NAS (Network Attached Storage) used to be just a place to dump files. Modern NAS hardware runs Docker containers, hosts virtual machines, and works as a legitimate multi-purpose home server. If your primary goal is data storage with lab capabilities on the side, this category is for you.
Synology DS224+ — Best NAS for Beginners
The DS224+ is the default recommendation in r/homelab and r/synology for good reason. Synology’s DSM operating system is the most polished NAS interface on the market. It’s genuinely easy to use while still being powerful enough for advanced configurations.
Specs:
– Intel Celeron J4125 (4C/4T, 2.7GHz)
– 2GB DDR4 (expandable to 6GB)
– 2x 3.5” SATA drive bays (up to 36TB per drive)
– 2x Gigabit Ethernet (link aggregation)
– 2x USB 3.2
– M.2 2280 NVMe cache slot
– ~15W idle power draw
Price: Synology DS224+ — around $300-350 (diskless)
Add drives: Seagate IronWolf 4TB NAS Drive — around $90 each
Synology’s Container Manager (their Docker integration) makes running containers almost as simple as installing a phone app. Search for a container image, fill in a few settings, and it’s running. They also have a package center with one-click installs for Plex, Jellyfin, Surveillance Station, and dozens of other apps.
The downside: 2GB of base RAM is tight. Upgrade to 6GB immediately if you plan to run Docker containers. The CPU is also modest. You won’t be doing heavy transcoding or running multiple VMs. This is a storage-first device that can handle light application hosting.
QNAP TS-464 — Best NAS for Power Users
QNAP gets less love online than Synology, partly because of some past security incidents with their older firmware. But the TS-464 is a genuinely capable piece of hardware that outspecs the Synology in raw capability.
Specs:
– Intel Celeron N5095 (4C/4T, 2.9GHz burst)
– 8GB DDR4 (expandable to 16GB)
– 4x 3.5” SATA drive bays
– 2x M.2 2280 NVMe slots
– 2x 2.5GbE
– HDMI 2.0 output
– PCIe Gen 3 x2 expansion slot
– ~25W idle power draw
Price: QNAP TS-464 — around $450-500 (diskless)
Four drive bays vs two, 8GB RAM vs 2GB, 2.5GbE vs Gigabit, and a PCIe slot for a 10GbE card or NVMe adapter. On paper, the QNAP wins every spec comparison. QNAP’s Virtualization Station also lets you run full VMs directly on the NAS, which Synology’s hardware can’t handle well.
The catch is software. QTS (QNAP’s OS) is functional but not as intuitive as DSM. And QNAP’s security track record has been rougher, though they’ve improved significantly since 2023. Keep firmware updated and don’t expose it directly to the internet.
NASCompares on YouTube has done extensive head-to-head testing between these two units, and their recommendation matches mine: Synology for ease of use, QNAP for raw specs. Pick based on your comfort level with tinkering.
Running TrueNAS on Your Own Hardware
If you have a spare PC or want to build something custom, TrueNAS (formerly FreeNAS) is a free, open-source NAS operating system that turns any x86 hardware into a full-featured storage server. The TrueNAS SCALE edition runs on Linux (vs the older FreeBSD-based CORE) and supports Docker natively through its app catalog.
TrueNAS wants ECC RAM for data integrity, though it’ll run on non-ECC just fine for a home lab. Pair it with an old Dell OptiPlex, install some drives, and you have a NAS that competes with the $500+ commercial units. Jeff Geerling has a solid TrueNAS setup guide on his blog that walks through the whole process.
This path is the most educational. You’ll learn about ZFS pools, RAID configurations, SMB/NFS shares, and Linux system administration. It’s also the most work upfront.
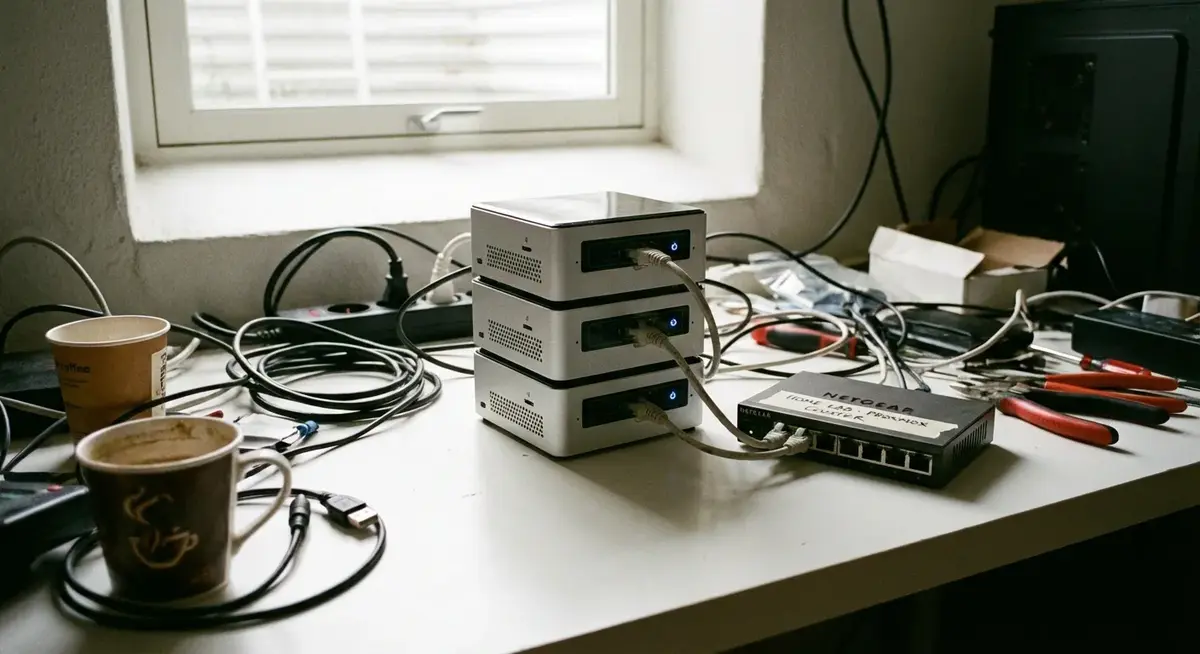
Repurposed Business Desktops — The Secret Budget Pick
The home lab community’s worst-kept secret: used business desktops from Dell, Lenovo, and HP are absurdly good value. Companies refresh their fleets every 3-4 years, and those machines flood the refurbished market at a fraction of original cost. NetworkChuck built an entire Proxmox cluster from used Dell OptiPlex machines in one of his most popular videos, and the concept holds up perfectly in 2026.
Dell OptiPlex Micro (7060/7070/7080)
What to look for:
– Intel Core i5-8500T or newer (6C/6T minimum)
– 16GB or 32GB DDR4
– 256GB+ NVMe SSD
– Gigabit Ethernet
– ~15-25W idle power draw
Price: $120-250 on Amazon refurbished or eBay
Where to buy: Dell OptiPlex 7080 Micro Refurbished — around $180-250
The micro form factor is smaller than most mini PCs. They’re dead silent, pull minimal power, and the i5 processors handle Proxmox and Docker without issues. The 7080 generation with 10th-gen Intel is the sweet spot for price vs capability right now.
Buy three of them for under $600 total and you have a Proxmox cluster with high availability, live migration, and shared storage. That’s worth more on a resume than any certification, and it costs less than a gaming console.
Lenovo ThinkCentre M920q / M920x
Similar story to the Dell. ThinkCentre Tiny desktops are built like tanks, have excellent thermal management, and regularly show up refurbished for $150-200 with i5 processors and 16GB RAM. The M920x variant includes a PCIe slot for a dedicated GPU or 10GbE NIC, which is rare in this form factor.
Raspberry Pi Clusters — Learning at the Lowest Cost
The Raspberry Pi 5 is no toy. With the 8GB model, you have a genuine quad-core ARM server capable of running Docker, K3s (lightweight Kubernetes), Pi-hole, Home Assistant, and more. The entire Jeff Geerling YouTube channel started with Raspberry Pi projects, and his Pi cluster build remains one of the best guides for building a multi-node lab.
Raspberry Pi 5 (8GB)
Specs:
– Broadcom BCM2712 (4x Cortex-A76, 2.4GHz)
– 8GB LPDDR4X
– microSD + M.2 HAT support (NVMe boot)
– Gigabit Ethernet
– 2x USB 3.0, 2x USB 2.0
– 2x micro-HDMI
– ~5-8W power draw
Price: Raspberry Pi 5 8GB — around $80
Essential accessories:
– Official Pi 5 Active Cooler — $5
– Raspberry Pi 5 Case — $10
– 27W USB-C Power Supply — $12
– Samsung EVO 128GB microSD — $13
Total for a ready-to-run Pi 5 server: about $120.
The Pi 5 with the M.2 HAT and an NVMe drive is a completely different experience than running off a microSD card. Boot times drop, app responsiveness improves dramatically, and you stop worrying about SD card corruption. If you’re using a Pi 5 as a permanent server, NVMe boot is worth the extra $25-30 for the HAT and a small SSD.
What a Pi is good for: Pi-hole, Home Assistant, WireGuard VPN, Nginx reverse proxy, lightweight Docker containers, K3s Kubernetes learning, network monitoring (Grafana + InfluxDB).
What a Pi struggles with: Multiple VMs (ARM + 8GB RAM is limiting), heavy database workloads, anything that needs fast disk I/O beyond what a single NVMe provides, x86-specific software.
The Software Stack: What to Install First
Hardware is half the equation. Here’s what to install, in the order I’d recommend for a beginner.
Proxmox VE (Free)
Proxmox Virtual Environment is a Debian-based hypervisor that lets you create and manage virtual machines and Linux containers through a web interface. It’s what most of the home lab community runs, and it’s completely free (the paid subscription gets you enterprise support and a stable update repo, but the no-subscription repo works fine).
Install Proxmox directly on your hardware (it replaces the OS). From there, create VMs for different purposes. Want to learn Windows Server? Spin up a VM. Need a Docker host? Create an Ubuntu VM. Want to try TrueNAS? Give it a VM with passed-through drives.
Techno Tim’s Proxmox series on YouTube is the gold standard for getting started. Clear, practical, and he covers real scenarios rather than contrived examples.
Docker + Portainer
If you’re not ready for full virtualization, just install Docker on Ubuntu or Debian and add Portainer for a web UI. Portainer makes container management visual. You can deploy, monitor, and manage containers through your browser instead of memorizing Docker CLI commands.
Start with these containers:
– Pi-hole or AdGuard Home — network-wide ad blocking
– Uptime Kuma — monitoring for your services
– Nginx Proxy Manager — reverse proxy with SSL certificates
– Heimdall or Homepage — dashboard for all your services
– Jellyfin — media server (free Plex alternative)
TrueNAS SCALE
If storage is your primary concern, TrueNAS SCALE runs on bare metal and gives you ZFS-based storage with Docker app support built in. It’s the all-in-one option for people who want NAS functionality without buying Synology/QNAP hardware.
Networking: The Overlooked Piece
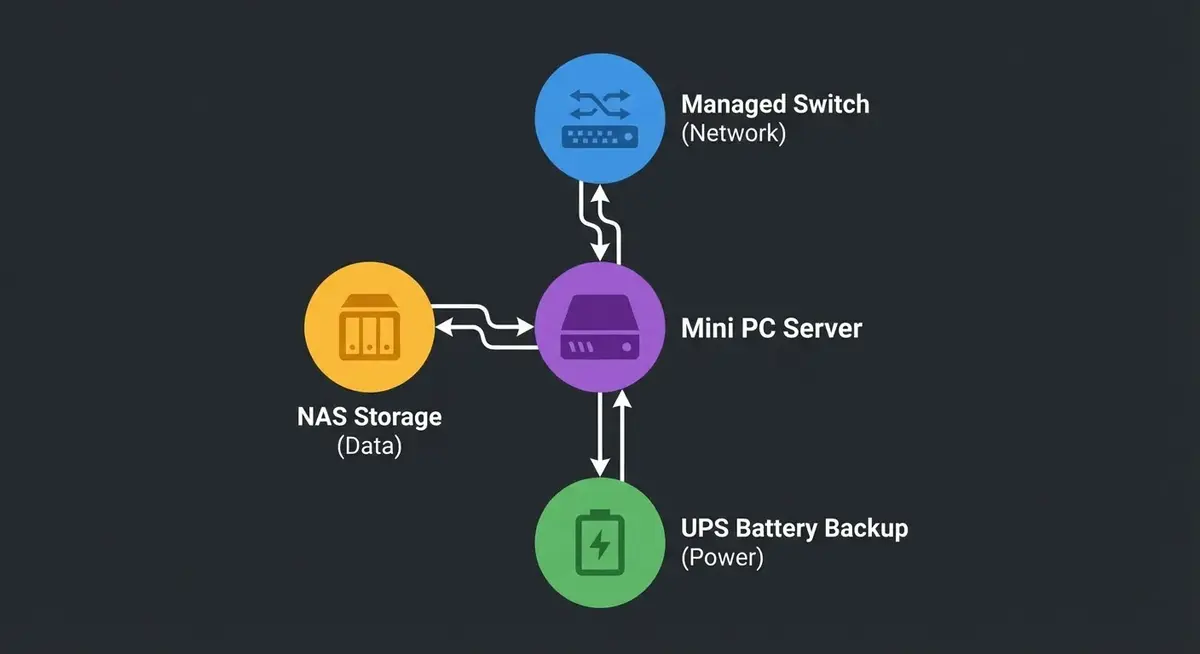
Your lab is only as fast as your network. A basic unmanaged Gigabit switch is fine to start, but consider these upgrades as you grow:
- Managed switch: VLANs let you segment your lab network from your home network. The TP-Link TL-SG108E is a solid budget managed switch around $30
- 2.5GbE switch: If your devices support 2.5GbE, the NICGIGA 8-Port 2.5G Switch for around $60 is a worthwhile upgrade
- UPS (Uninterruptible Power Supply): Your lab runs 24/7. Protect it from power blips. A CyberPower CP1500AVRLCD3 handles a mini PC + NAS + switch for about 30 minutes during an outage
Power Consumption: The Hidden Cost
This comes up constantly in r/homelab, so here’s the math:
| Device | Idle Watts | Monthly Cost (at $0.13/kWh) | Annual Cost |
|---|---|---|---|
| Raspberry Pi 5 | 5W | $0.47 | $5.69 |
| Beelink SER5 MAX | 15W | $1.42 | $17.08 |
| Dell OptiPlex Micro | 12W | $1.14 | $13.67 |
| Synology DS224+ (2 drives) | 15W | $1.42 | $17.08 |
| QNAP TS-464 (4 drives) | 25W | $2.37 | $28.47 |
| Minisforum UM790 Pro | 18W | $1.71 | $20.51 |
| Old tower PC/server | 65-120W | $6.16-$11.38 | $73.94-$136.57 |
This is why the home lab community moved away from old rack servers. That Dell PowerEdge R720 on eBay for $150 sounds great until you realize it draws 200W+ and sounds like a hair dryer.
My Recommendation: Where to Actually Start
Tight budget ($100-150): Raspberry Pi 5 8GB with NVMe HAT. Install Docker + Portainer. Learn containers, self-hosting, and Linux basics. You’ll outgrow it in 6-12 months, but you’ll know exactly what you need next.
Normal budget ($250-400): Beelink SER5 MAX 32GB. Install Proxmox. Create a Docker host VM, experiment with VMs, learn networking. This setup genuinely handles 90% of what beginners want to accomplish.
Storage-focused ($400-600): Synology DS224+ with two 4TB IronWolf drives. Use it for backups and media first, then explore Docker containers through Container Manager. Add a Pi 5 for Proxmox learning alongside it.
Go big ($500-800): Two or three used Dell OptiPlex Micros. Create a Proxmox cluster. Learn high availability, live migration, shared storage with Ceph. This is the setup that translates directly to professional skills.
There’s no wrong answer here. Every piece of hardware teaches you something. Start small, learn what you actually use, and expand from there. The gear you buy first probably won’t be the gear you’re running a year from now, and that’s the whole point.
Prices checked March 2026. Amazon affiliate links help support the site at no extra cost to you.