If you’ve ever tried to buy a Raspberry Pi “the cheap way” by hunting down each part individually, you know how that story ends. You get the board, then realize you need a power supply, then a case, then a microSD card, then a micro HDMI cable (yes, micro, not mini), and suddenly you’ve spent twice as much and still can’t boot the thing for another three days while you wait for shipping. I’ve done it. It’s not worth it.
The Pi 5 is a different machine from its predecessors. The jump in performance is real, it finally has a PCIe connector for NVMe storage, and it runs hot enough that thermal management actually matters. That means picking the right kit or accessories upfront saves you real headaches, not just a few bucks.
This guide is what I wish someone had handed me. I’ll tell you exactly what to buy depending on what you want to do, what I personally use, and what to skip entirely.
Best Overall Starter Kit: CanaKit Raspberry Pi 5 Starter Kit

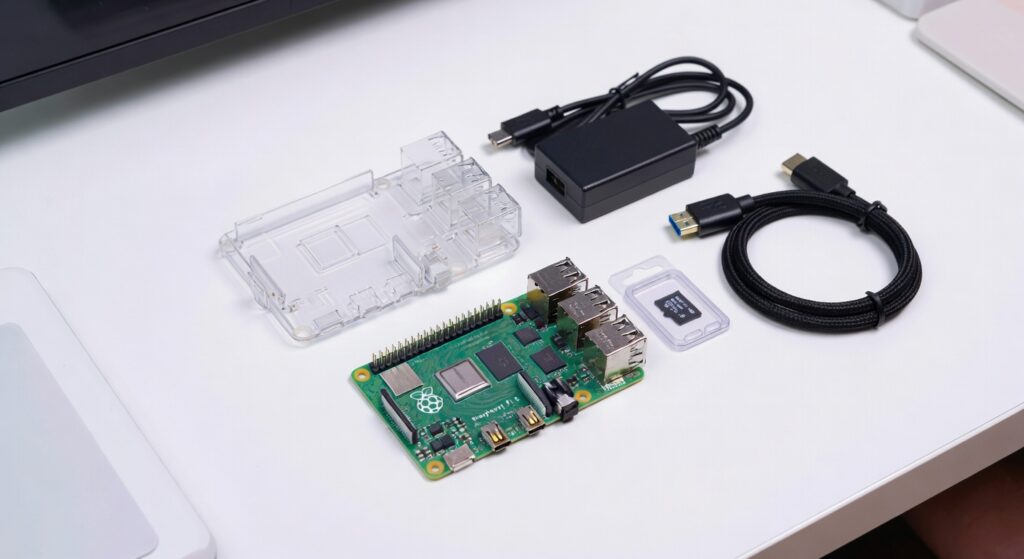
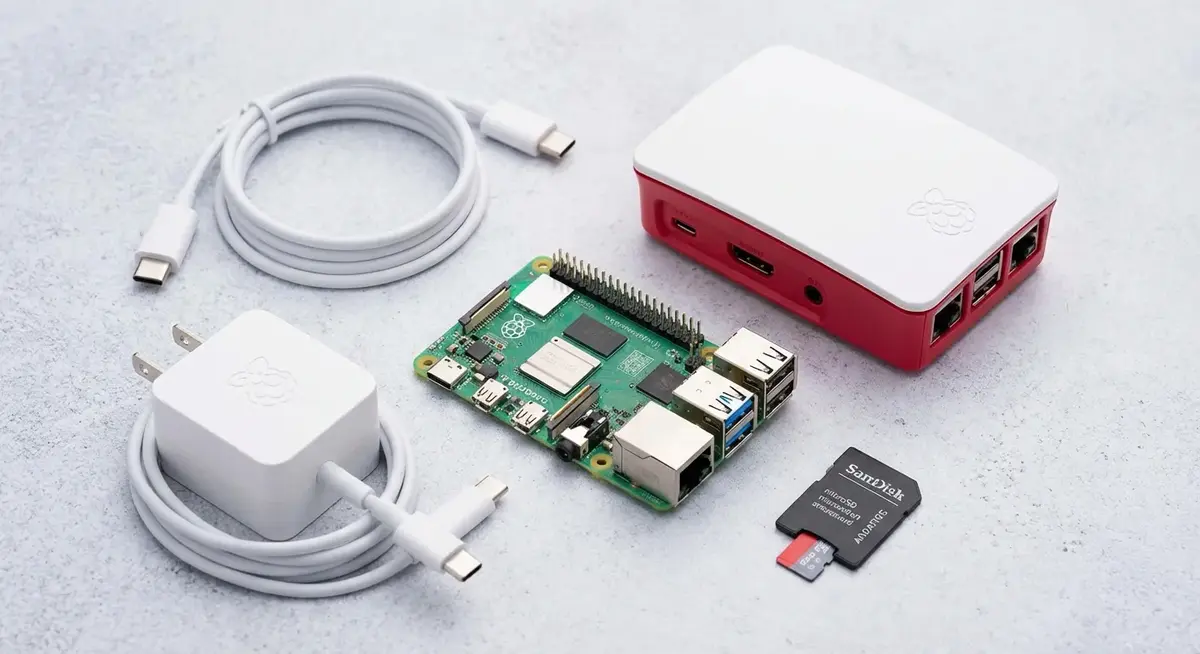
For most people, especially if this is your first Pi, the CanaKit Raspberry Pi 5 Starter Kit (8GB) is just the right answer. It comes with the board, a case, a USB-C power supply, a pre-loaded microSD card, a micro HDMI to HDMI cable, and a heatsink set. Everything you need is in one box.
I picked up the 8GB version a while back for my home server project and I appreciated that I could plug everything in and boot Raspberry Pi OS within about 15 minutes. No scrambling for adapters, no “wait, what power supply does this need” panic.
The included case is nothing fancy but it does the job. It has a fan, which matters on the Pi 5 more than on any previous model. The board runs significantly warmer under load, and without any cooling you’ll start seeing thermal throttling pretty quickly. CanaKit’s case handles this reasonably well out of the box.
If you want to save a few bucks and 4GB of RAM is enough for your use case (Pi-hole, home automation, basic desktop, light retro gaming), the CanaKit 4GB version does the exact same thing for less money. I’d still recommend the 8GB if budget isn’t a constraint, just because RAM is the one thing you can never add later.
Price: Typically $119-$139 for the 8GB kit depending on when you catch it.
Who should buy it: First-timers, gift buyers, anyone who doesn’t want to think about parts compatibility.
Best Budget Kit: Vilros Raspberry Pi 5 Basic Kit

The Vilros Raspberry Pi 5 Basic Kit is the leaner option if you’re watching your spend. Vilros has been in the Pi accessories game for years and their stuff is decent quality, not Amazon warehouse junk.
The tradeoff is that you usually get less in the box. Depending on which Vilros bundle you grab, you might be missing a microSD card, or the case is more minimal, or the power supply is a slightly lower wattage version. Read the specific listing carefully before you order.
That said, if you already have a decent microSD card lying around from an old Pi project, a Vilros kit can save you $20-$30 without cutting any corners that actually matter to you. I’ve recommended these to people at my local maker meetup who already had a stash of SD cards and just needed the board plus a case.
The one thing I’d double-check: make sure whatever bundle you pick includes a 27W USB-C power supply or plan to buy the official one separately. The Pi 5 is noticeably more power-hungry than its predecessors and you’ll get a low voltage warning icon if you run it off an old phone charger.
Price: Usually lands around $80-$100 depending on what’s included.
Who should buy it: People upgrading from an older Pi who already have accessories, or budget-conscious buyers who are comfortable checking what’s included.
Best for Tinkerers: Freenove Ultimate Starter Kit
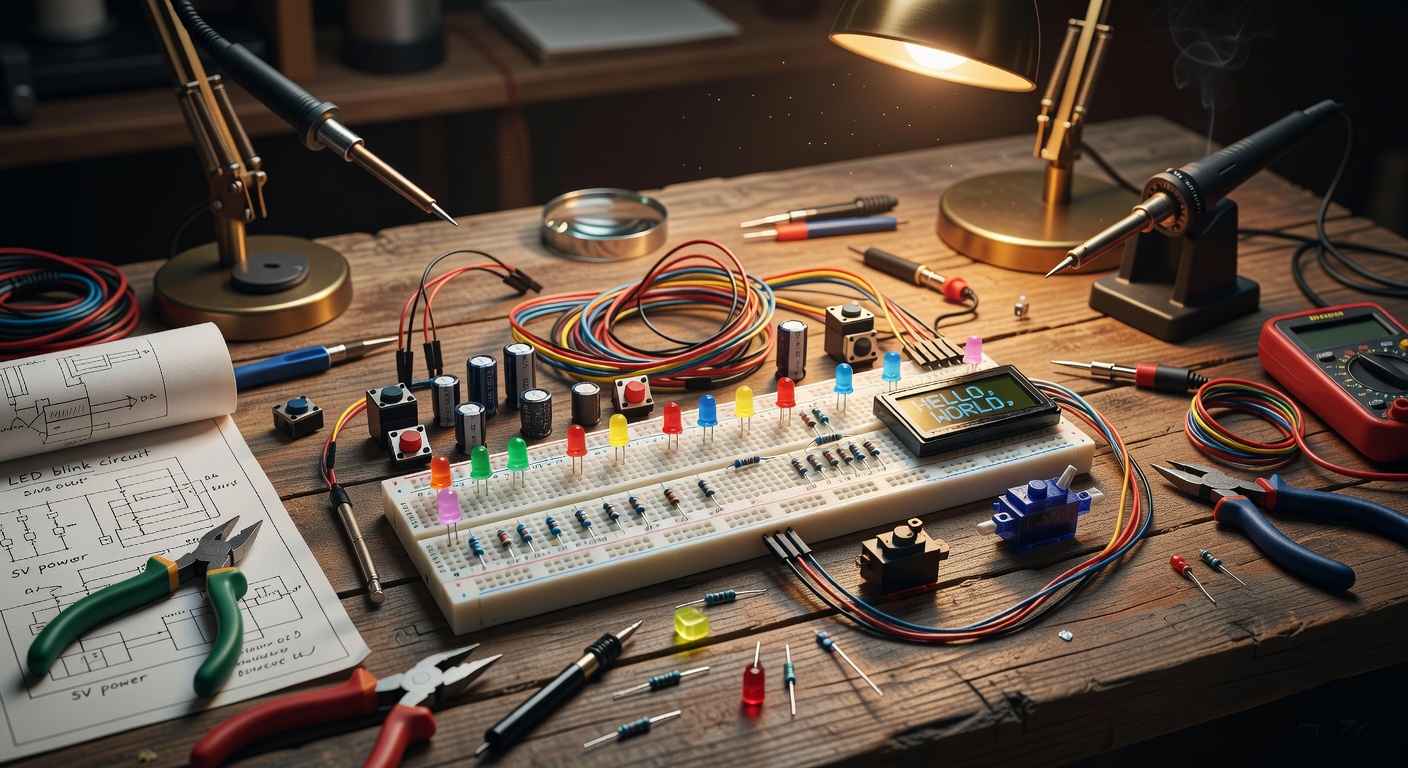
If you want to actually learn electronics while you play with your Pi, the Freenove Ultimate Starter Kit is in a completely different category from the other two.
This thing ships with a breadboard, LEDs, resistors, capacitors, buttons, temperature sensors, motion sensors, a buzzer, an LCD screen, servos, a stepper motor, and honestly I’m still finding components in the box. It also comes with a detailed tutorial booklet (or downloadable PDF) that walks you through dozens of projects from blinking an LED all the way to building a security camera system.
I bought one of these for a nephew who was getting into electronics. He’s 16 and had never touched a GPIO pin in his life. Within a weekend he had a working LED reaction timer game built from scratch. The tutorials are that good.
One thing to know: this kit doesn’t include the Pi itself. You’re buying the components and the tutorials, not the board. Budget accordingly, and make sure you get the version specifically made for Pi 5 since some older Freenove kits were designed around Pi 4 and the pinout documentation can get confusing.
Price: Around $35-$50 for the kit, then add your Pi separately.
Who should buy it: Hobbyists who want to learn, parents buying for kids, anyone who’s done “hello world” and wants to go deeper.
Best Case: Argon ONE V3
I’ve tried a lot of Pi cases over the years. The official case is fine. The CanaKit one that comes with the starter kit is fine. But if you’re building something you actually want to leave running for months, the Argon ONE V3 is the case I keep going back to.
The design routes all the ports to the back of the unit, so your project looks like a small set-top box rather than a bird’s nest of cables sticking out of all four sides. The aluminum shell acts as a passive heatsink and there’s a small fan built in, controlled by software so it only spins up when the CPU actually needs it. My Pi runs quieter and cooler in this case than in anything else I’ve tested.
The M.2 slot version is worth considering if you’re planning the NVMe upgrade below. It packages the SSD base into the same footprint.
Installation takes about 10 minutes. The power button wired to the GPIO header actually functions as a proper shutdown button once you install the Argon config script, which is a small thing that I appreciate way more than I expected.
Price: Around $30-$40.
Who should buy it: Anyone planning a permanent or semi-permanent installation, media center builds, home servers, Pi-hole setups.
Best Storage Upgrade: NVMe SSD Base
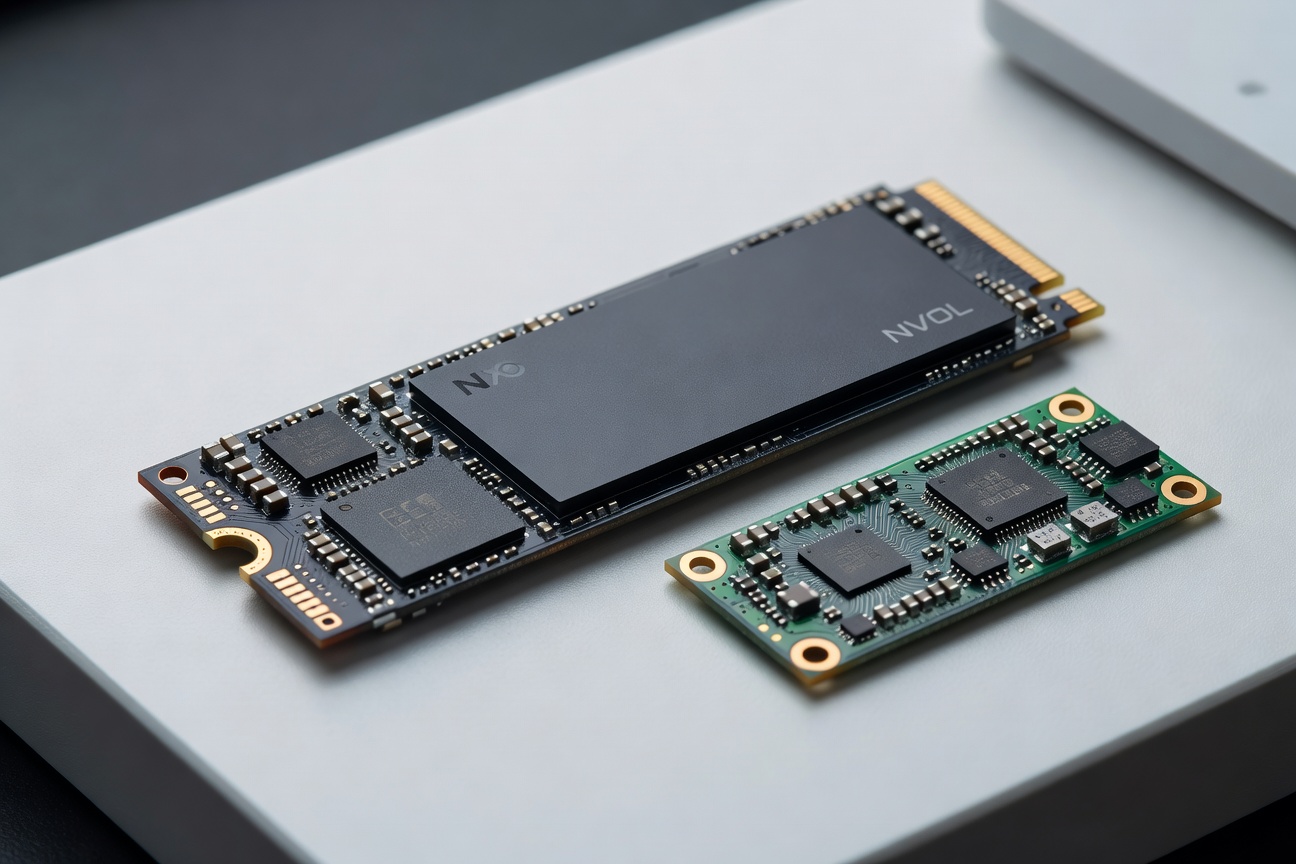
This is where the Pi 5 separates itself from every Pi before it. The PCIe 2.0 interface on the Pi 5 means you can attach an NVMe SSD and get sequential read speeds in the 400-500 MB/s range. Compare that to a microSD card doing maybe 90 MB/s on a good day.
The NVMe SSD Base for Raspberry Pi 5 is the cleanest way to do this. It attaches to the bottom of the board via the PCIe connector, holds an M.2 2242 or 2280 drive, and powers directly from the Pi. No external power brick, no USB dongle kludge.
For the drive itself, I’ve had good results with WD Green and Kingston NV3 drives in the 256GB-512GB range. Avoid the cheapest no-name options since there are known compatibility issues with some drives and the Pi 5’s PCIe controller. The Pi Foundation’s hardware compatibility list is worth a quick check before you buy.
Once you boot from NVMe, using a microSD card feels like going back to dial-up. Everything is snappier. Compiling code, loading applications, even desktop responsiveness. If you’re setting up a home server or something you care about being fast and reliable, this is the upgrade that makes the most difference.
Price: The base is around $20-$30. Budget another $30-$60 for the drive depending on size.
Who should buy it: Anyone doing a home server, media center, or anything they want to run reliably for a long time.
Best microSD: Samsung PRO Endurance
If you’re not going the NVMe route yet, or if you want a boot drive for a lightweight project, card selection actually matters more for a Pi than for a camera or phone.
The reason is that Pi OS writes constantly to the SD card for logs, temp files, swap, and general OS housekeeping. Regular cards (even fast ones labeled “UHS-I” or “Class 10”) aren’t built for that many write cycles and they fail. Sometimes embarrassingly fast.
The Samsung PRO Endurance line is specifically engineered for high-write applications like dashcams and security cameras, which means it handles Pi workloads well. The Samsung PRO Endurance 256GB is my current pick if you want headroom, or the 128GB version if you just need something reliable for a lighter project.
Both are rated for 140MB/s reads, which is solid for a card, and the endurance rating means you’re not going to have a dead card six months into your Pi-hole install.
Price: 128GB around $18-$22, 256GB around $30-$35.
Essential Accessories
Official Raspberry Pi 27W USB-C Power Supply
Don’t cheap out on the power supply. Seriously. The Pi 5 officially needs 5V at 5A (25W) and the Raspberry Pi Foundation rates their supply at 27W to give a little headroom. Running on a marginal supply causes random crashes, SD card corruption, and the yellow lightning bolt icon of shame in the corner of your desktop.
The official supply is usually around $12-$15 and it’s worth every penny. Most CanaKit bundles include a decent alternative, but if you’re piecing things together yourself, buy the official one.
Official Raspberry Pi 5 Active Cooler
If you’re not using an Argon ONE or another case with built-in thermal management, the Official Raspberry Pi 5 Active Cooler is what I’d grab. It’s a heatsink plus blower fan combo that mounts directly to the board, clips on without tools, and connects to the fan header for software speed control.
Under sustained load, this thing keeps temps 20-25 degrees cooler than no cooling at all. The Pi 5 will throttle CPU speed when it hits around 85°C, so if you’re compiling, running AI workloads, or doing anything compute-heavy, this is a straightforward fix.
Price: Around $5-$8.
Micro HDMI Cable
This is the one that trips up more people than anything else. The Pi 5 uses micro HDMI (not mini, not full-size). Most people have a drawer full of mini HDMI cables and exactly zero micro HDMI cables. CanaKit kits include one, but if you’re buying components separately, add a short cable to your order before you forget.
Keyboard and Mouse
If you need something for a Pi desktop setup, I actually like the Logitech K400 Plus wireless touchpad keyboard. It’s a single dongle, runs on AA batteries forever, and the integrated touchpad means you don’t need a separate mouse. Around $25 and easy to tuck away when you’re done.
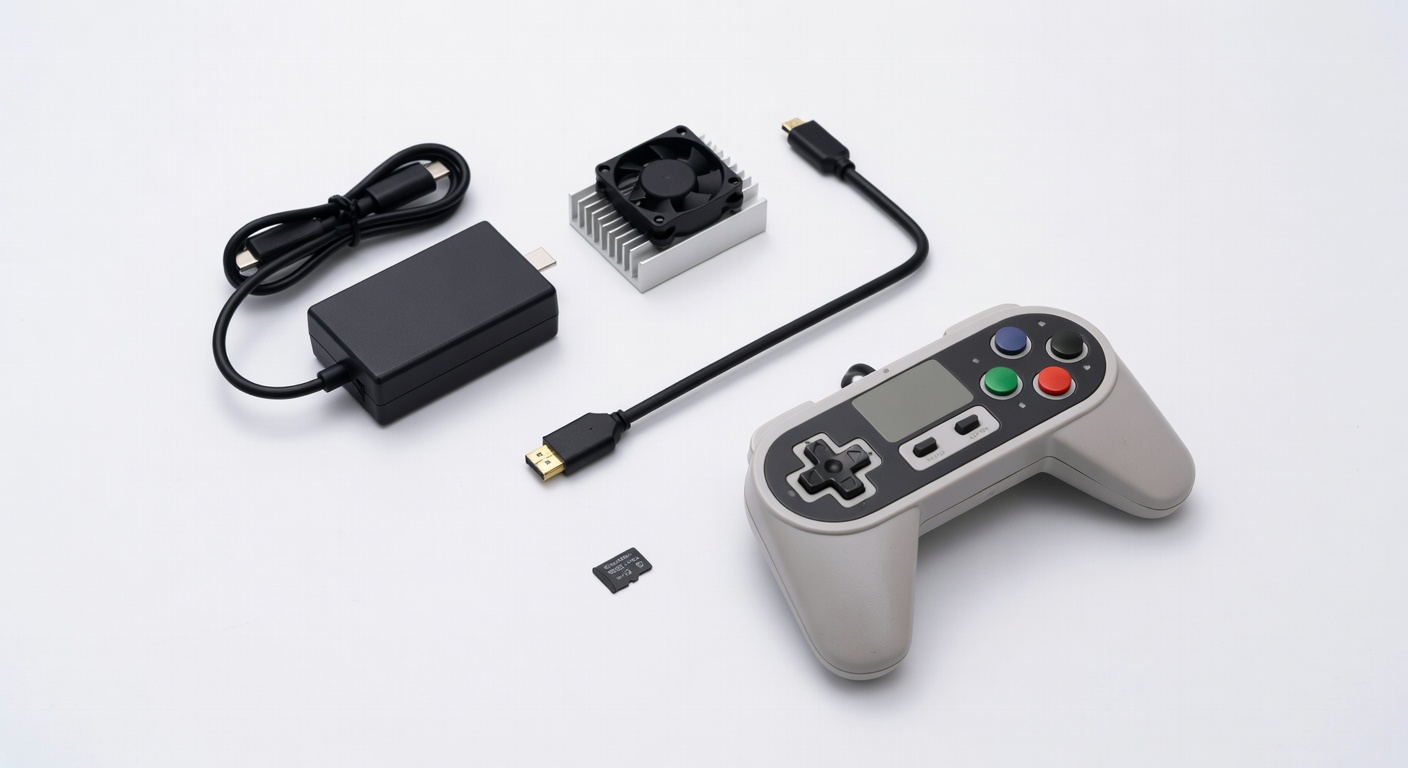
Controller for RetroPie
If retro gaming is part of the plan, the 8BitDo SN30 Pro connects via Bluetooth, has a d-pad that actually feels good, and works out of the box with RetroPie. I’ve used a few different controllers for Pi gaming setups and this one has the best combination of build quality and compatibility. The SNES-style layout is also just deeply nostalgic in the best way.
What to Skip
Expensive HATs you don’t have a project for yet. It’s tempting to buy a sense HAT or a display HAT or a motor controller HAT “just in case.” They’ll sit in a drawer. Buy components when you have a specific project that needs them.
RGB cooling towers. There are $30 RGB fan cases designed for the Pi that look cool in photos and perform worse than the $8 official active cooler. The aluminum fins are mostly for aesthetics, the airflow is poor, and you end up with a glowing paperweight.
Ultra-cheap microSD cards from unknown brands. I’ve seen people go through three $8 no-name cards in a year. Just buy the Samsung. It’s a $20 decision that prevents a lot of frustration.
A Pi 5 if you actually need a Pi 4. I mean this seriously. If your project is Pi-hole or a simple home automation hub, a Pi 4 (if you can find one at a reasonable price) does the job and consumes less power. The Pi 5 is worth it for performance-sensitive tasks, but it’s more expensive and warmer-running. Don’t automatically assume newer equals better for your specific use case.
Overpriced HDMI cables. A micro HDMI to HDMI cable is $7-$10 from a reputable brand on Amazon. You do not need a $40 “audiophile grade” cable. Electrons don’t know the difference.
Where to Go From Here
Once you have your hardware sorted, the next question is what to actually build. I put together a list of the best Pi 5 projects for beginners that covers everything from home servers to weather stations to retro gaming setups, with setup guides for each.
If you want a quick win for your first project, blocking ads on your entire home network with Pi-hole is weirdly satisfying and takes about 20 minutes. Check out the Pi-hole setup guide for Pi 5 when you’re ready.
And if you just want some inspiration before committing, the 5 fun things to do with a Pi post is a good place to browse.
The Pi 5 is the best single-board computer you can buy right now for the money. Pick the right kit, grab the right accessories, and you’ll have something running in an afternoon.