
ESP8266 Send DHT Temperature & Humidity Readings to MQTT & OLED Display
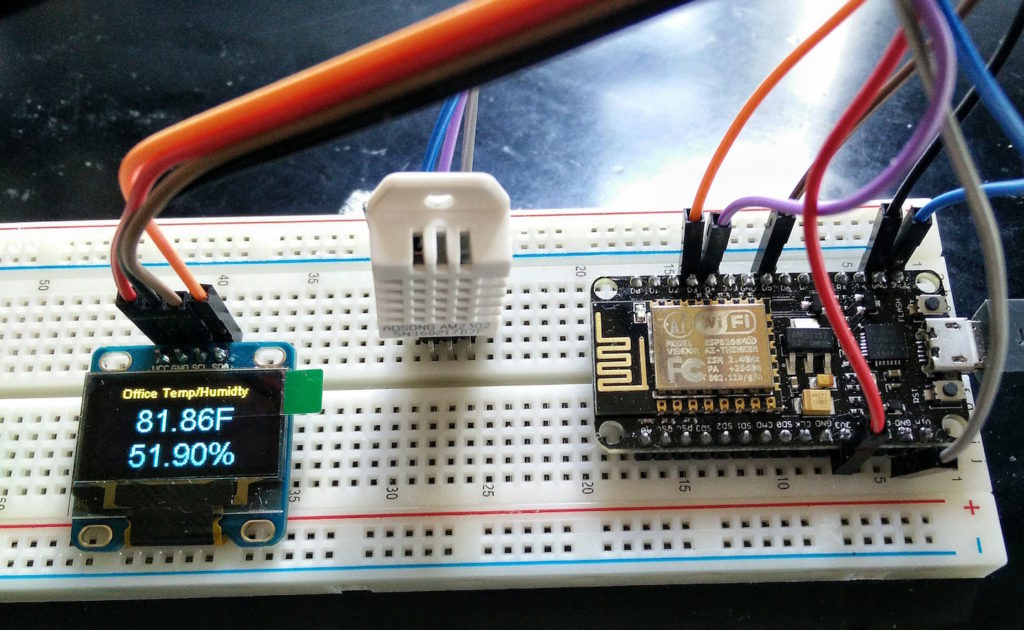
I had an extra ESP8266 laying around (as we all should) and decided to create a Temperature & Humidity Sensor for my office. The Raspberry Pi I was previously using for this has since been repurposed into a tracked robot tasked with such things as driving our bearded dragon Rex around.
*There are some great ESP8266 How Tos on Daniel Eichhorn’s blog “Squix Techblog” http://blog.squix.org/ He sells a few kits, including an ESP8266 Weatherstation that has most of the needed parts that match up to his projects and that would work for this project too. Daniel also co-wrote the SSD1306 OLED library we’re using. Thanks Daniel!

Currently for my Home Automation, I am using OpenHab. With OpenHab it is fairly easy to receive MQTT data. While browsing the OpenHab forums, I came across a thread for the Homie ESP8266 Project. *See the bottom of this post my OpenHab item and sitemap additions.
“MQTT is a machine-to-machine (M2M)/”Internet of Things” connectivity protocol. It was designed as an extremely lightweight publish/subscribe messaging transport. It is useful for connections with remote locations where a small code footprint is required and/or network bandwidth is at a premium.” – MQTT.org
Homie is an Arduino Library for the ESP8266 which provides a framework for the MQTT convention to use with IoT implementations.
Features:
- Automatic connection/reconnection to Wi-Fi/MQTT
- JSON configuration file to configure the device
- Cute HTTP API / Web UI / App to remotely send the configuration to the device and get information about it
- Custom settings
- OTA over MQTT
- Magic bytes
- Available in the PlatformIO registry
Right now I am using the 1.5.0 release version, but they are also actively working on Homie 2.0.
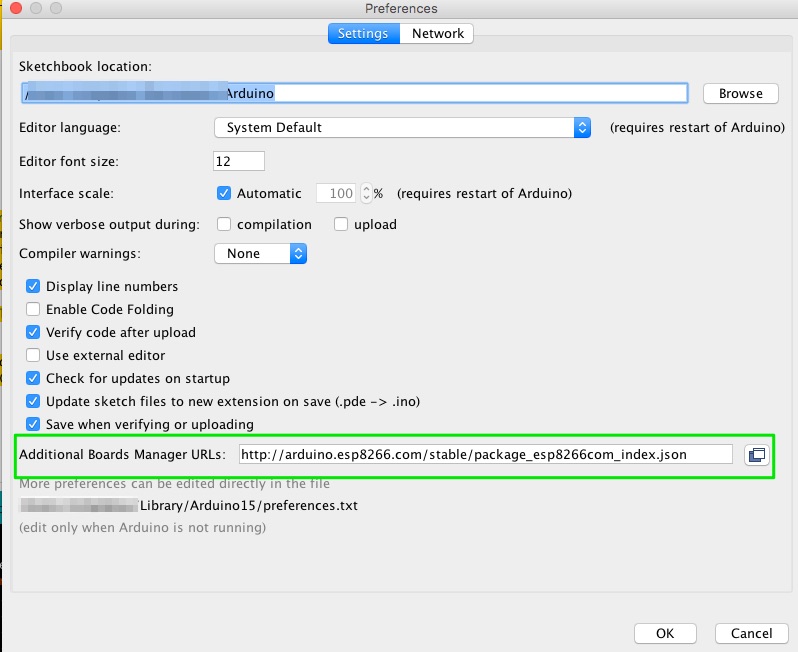
For this Arduino Sketch I am assuming you already have your ESP8266 working with it, if not you’ll need to add this in Preferences -Additional Boards:
http://arduino.esp8266.com/stable/package_esp8266com_index.json
*Disclaimer: Most if not all links on this page will be Affiliate Links. This helps pay for things like website hosting and more bits & gadgets to write about.
You will also need the following hardware:
ESP8266 – Usually around $8.79 on Amazon
DHT22/AM2302 (some have the pull up resistor built in) – $20 for 3 buy more if you plan to use a few around the house.
A DHT11 will also work, but they are known to be less accurate.
SSD1306 .96″ OLED I2C 4 Wire – You can get two for $17.99 on Amazon
Some of these come with 2 display colors where the top 16 pixels are yellow and the remaining are blue. Others come in just one color. I am using a Yellow/Blue combo on this project. There are also some larger displays available that are 1.3″.
Breadboard & Jumper Wires – $8.99 on Amazon
(As always these are Amazon Affiliate links and you may be able to find the items cheaper on Ebay, BangGood or AliExpress. I just don’t like waiting!)
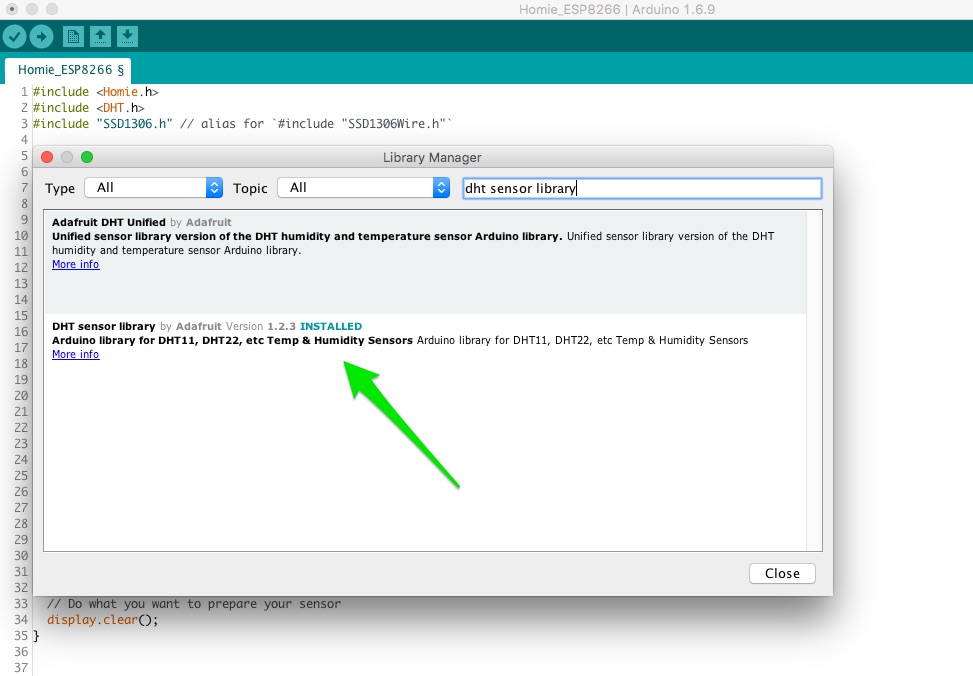
In Arduino ( I am on version 1.6.9), we need 3 Libraries:
#include <DHT.h>
#include "SSD1306.h" // alias for `#include "SSD1306Wire.h"`
#include <Homie.h>
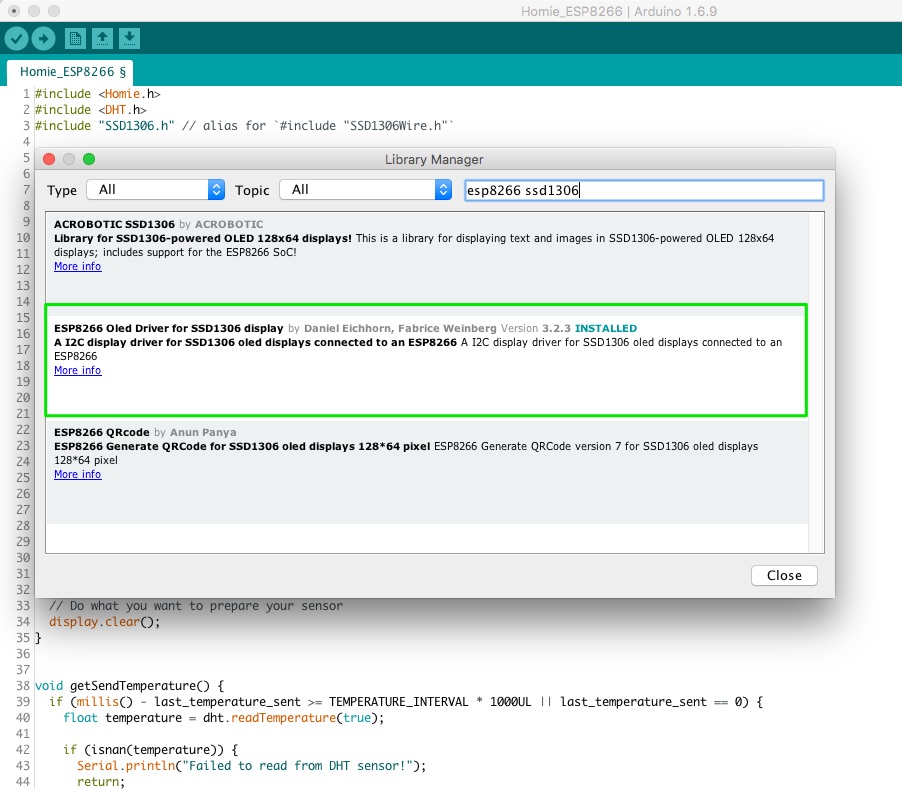
The DHT and SSD1306Wire Libraries can be installed easily from within Arduino:
Sketch -> Include Library -> Manage Libraries
And for the Homie Library, download the zip file from Releases and place it into your Library folder. Then do:
Sketch -> Include Library -> ADD .ZIP Library
And pick the zip you downloaded.
Homie also has 4 Dependencies you will also need to install in Arduino:
- ArduinoJson >= 5.0.8
- Bounce2
- ESPAsyncTCP >= c8ed544
- AsyncMqttClient
ArduinoJSON and Bounce2 are available through the Arduino IDE by doing Sketch → Include Library → Manage Libraries. For ESPAsyncTCP & AsyncMqttClient, you need to first download the .zips from GitHub and then install them in Arduino by doing:
Sketch -> Include Library -> ADD .ZIP Library
More info on installing Homie can be found on their “Getting Started” page here: https://homie-esp8266.readme.io/docs/getting-started
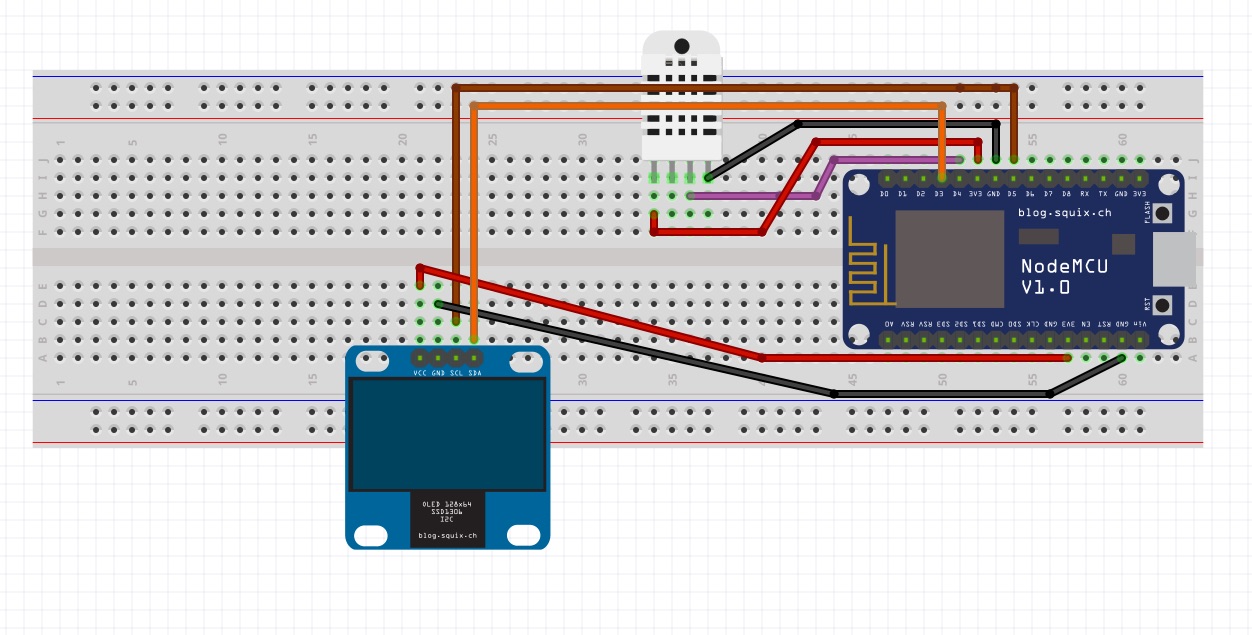
DHT Wiring:
Some DHTs may have 4 pins but only 3 are active: VCC(3V), Data, GND
VCC -> 3V3

DATA -> D4

GND -> GND
On this sketch I have the Data Pin going to D4 on the ESP8266.
SSD1306 OLED Wiring:
Some of these are 5V tolerant but I have mine wired as follows:
VCC -> 3V3

GNG -> GND

SDA -> D3

SCL -> D5
Fritzing!
Arduino Sketch
/**
 * The MIT License (MIT)
 *
 * Copyright (c) 2016 by Daniel Eichhorn
 *
 * Permission is hereby granted, free of charge, to any person obtaining a copy
 * of this software and associated documentation files (the "Software"), to deal
 * in the Software without restriction, including without limitation the rights
 * to use, copy, modify, merge, publish, distribute, sublicense, and/or sell
 * copies of the Software, and to permit persons to whom the Software is
 * furnished to do so, subject to the following conditions:
 *
 * The above copyright notice and this permission notice shall be included in all
 * copies or substantial portions of the Software.
 *
 * THE SOFTWARE IS PROVIDED "AS IS", WITHOUT WARRANTY OF ANY KIND, EXPRESS OR
 * IMPLIED, INCLUDING BUT NOT LIMITED TO THE WARRANTIES OF MERCHANTABILITY,
 * FITNESS FOR A PARTICULAR PURPOSE AND NONINFRINGEMENT. IN NO EVENT SHALL THE
 * AUTHORS OR COPYRIGHT HOLDERS BE LIABLE FOR ANY CLAIM, DAMAGES OR OTHER
 * LIABILITY, WHETHER IN AN ACTION OF CONTRACT, TORT OR OTHERWISE, ARISING FROM,
 * OUT OF OR IN CONNECTION WITH THE SOFTWARE OR THE USE OR OTHER DEALINGS IN THE
 * SOFTWARE.
 *
 */

#include <Homie.h>
#include <DHT.h>
#include "SSD1306.h" // alias for `#include "SSD1306Wire.h"`


#define DHTPIN D4     // what pin the DHT is connected to

// Initialize the OLED display using Wire library
SSD1306  display(0x3C, D3, D5); // (I2C Address, SCL Pin, SDA Pin)

// Uncomment whatever type you're using!
//#define DHTTYPE DHT11   // DHT 11
#define DHTTYPE DHT22   // DHT 22  (AM2302)
//#define DHTTYPE DHT21   // DHT 21 (AM2301)


const int TEMPERATURE_INTERVAL = 30;
unsigned long last_temperature_sent = 0;

const int HUMIDITY_INTERVAL = 30;
unsigned long last_humidity_sent = 0;
String display_temp;
String display_humid;

HomieNode temperatureNode("temperature", "temperature");
HomieNode humidityNode("humidity", "humidity");

DHT dht(DHTPIN, DHTTYPE);

void setupHandler() {
  // Do what you want to prepare your sensor
  display.clear();
}


void getSendTemperature() {
  if (millis() - last_temperature_sent >= TEMPERATURE_INTERVAL * 1000UL || last_temperature_sent == 0) {
    float temperature = dht.readTemperature(true);

    if (isnan(temperature)) {
      Serial.println("Failed to read from DHT sensor!");
      return;
    }
    display_temp = temperature;
    Serial.print("Temperature: ");
    Serial.print(temperature);

    Serial.println(" °F");
    if (Homie.setNodeProperty(temperatureNode, "temperature", String(temperature), true)) {
      last_temperature_sent = millis();
    } else {
      Serial.println("Sending failed");
    }
  }
}

void getSendHumid() {
  if (millis() - last_humidity_sent >= HUMIDITY_INTERVAL * 1000UL || last_humidity_sent == 0) {
    float humidity = dht.readHumidity();

    if (isnan(humidity)) {
      Serial.println("Failed to read from DHT sensor!");
      return;
    }
    display_humid = humidity;
    Serial.print("Humidity: ");
    Serial.print(humidity);
    Serial.println(" %");

    if (Homie.setNodeProperty(humidityNode, "humidity", String(humidity), true)) {
      last_humidity_sent = millis();
    } else {
      Serial.println("Sending failed");
    }
  }
}

void displayData() {
    display.clear();
    display.setTextAlignment(TEXT_ALIGN_CENTER);
    display.setFont(ArialMT_Plain_10);
    display.drawString(64, 0, "Office Temp/Humidty");
    display.setFont(ArialMT_Plain_24);
    display.drawString(66, 13, display_temp + "F");
    display.drawString(66, 40, display_humid + "%");
    display.display();
}

void loopHandler() {
  getSendTemperature();
  getSendHumid();
  displayData();
}

void setup() {
  Homie.setFirmware("awesome-temperature", "1.0.0");
  Homie.registerNode(temperatureNode);
  Homie.registerNode(humidityNode);
  Homie.setSetupFunction(setupHandler);
  Homie.setLoopFunction(loopHandler);
  Homie.setup();
  // Initialising the display.
  display.init();
  display.clear();
  display.flipScreenVertically();
  display.setTextAlignment(TEXT_ALIGN_CENTER);
  display.display();
}

void loop() {
  Homie.loop();
}
MQTT Server
You’ll need to have a MQTT Server setup before you proceed with the Homie Configuration. I am currently using Moquitto on my iMac but they also have downloads for other operating systems: https://mosquitto.org/download/
Alternatively, you can use a cloud MQTT service such as CloudMQTT(free up to 10 devices)
Homie Configuration
After uploading the sketch, you may notice that nothing is working and shout “WTF!” If you have your Serial Monitor open, you will see that Homie is in Configuration Mode. From your smartphone (or your computer if it is connected to your WiFi), first open this page:
http://marvinroger.github.io/homie-esp8266/
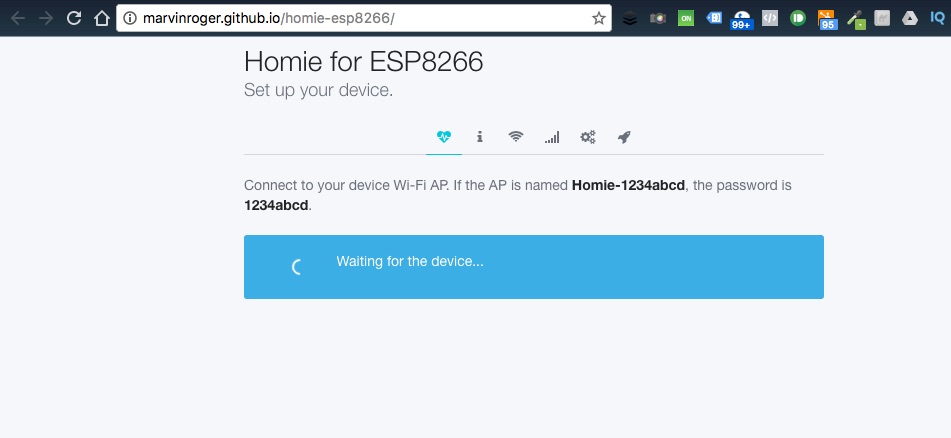
Next connect to the WiFi Access Point that starts with the word “Homie” it will also have a device number, “Home-d123456”
After you connect the webpage will walk you through the configuration of your Homie ESP8266, where you’ll connect it to your Wifi Network and enter in your MQTT server info.
The full documentation for Homie can be found here: https://homie-esp8266.readme.io/docs
After that is done your ESP8266 should restart into Normal Mode.. If it doesn’t after a few minutes, power cycle it. Shortly after that you should see the temperature and humidity readings!
OpenHAB
In OpenHAB, you’ll need to have an MQTT host setup and configure already. In the default.items file I have it setup like this and be sure to change “devices/d312348/” to the device id that matches your Homie setup.
Number Homie1Temp "Office Temp [%.1f °F]" { mqtt="<[mosquitto:devices/d312348/temperature/temperature:state:default]" }

Number Homie1Humid "Office Humid [%.1f %%]" { mqtt="<[mosquitto:devices/d312348/humidity/humidity:state:default]" }
In the default.sitemap I have:
Frame label="Temperature and Humidity" {

Textitem=Homie1Temp icon="temperature"

Text item=Homie1Humid icon="water"

Textitem=Chip1Temp icon="temperature"

Textitem=Chip1Humid icon="water"

Text item=SmallGarageTemp icon="temperature"

Text item=SmallGarageHumid icon="water"

}

[ratings]
Reminder, some links in the post might be affiliate links, so I’ll make some coffee/beer/gadget money if you buy anything. You get it at the normal price, though!