
*Update Feb 24, 2017: You will need the updated MYQ to get this working again: New MYQ Binding 1.10.0
*As of Feb 14, 2017 the MYQ Openhab Addon is not working. Apparently MYQ has made some changes to their API. We’re waiting on an updated OH MYQ Addon. https://community.openhab.org/t/broken-chamberlain-myq-has-changed-something/21381
If you are looking for a way to control a non-Chamberlain Garage Door, then check out or DIY IOT Garage Door Opener Post: https://www.wemustbegeeks.com/esp8266-nodemcu-wifi-iot-garage-door-opener-relay-with-cayenne/)
Previously we covered some Cool Things You Can do with Amazon Alexa (Echo) and IFTTT and the one that y’all seem most interested in is How to Control MYQ (Chamberlain/LIftmaster) with Alexa. This can be done using a combination of OpenHab, a vendor and technology agnostic open source automation software for your home, and IFTTT, a Free Web Service that lets you tie different apps, services and devices together.
The openHAB runtime comes as a platform-independent zip file. Later we will cover how to install it.
Credit goes to Scott H. who I believe wrote the original MYQ binding for openHAB! You can read the original MYQ openHAB thread here: https://community.openhab.org/t/chamberlain-myq-binding/4192
*Editors Note: the openHAB Foundation recently launched an updated version of the my.openHAB service breaking IFTTT as on December 16. After the holiday we will redo this post with the new instructions, but if you cannot wait here is what you will need to do for openHAB 1.8:
- Read through this thread on community.openhab .org : https://community.openhab.org/t/myopenhab-replaces-my-openhab/
- Read this page on the new openHAB Cloud Connector: https://github.com/openhab/openhab/wiki/openHAB-Cloud-Connector
- Download the the new cloud connector jar and put it in your addons folder: https://dl.bintray.com/openhab/bin/org.openhab.io.openhabcloud_1.9.0.201612192331.jar
- Remove the old myopenhab addon from the folder
- Restart openhab
- Add the following to your openhab.cfg
############################## openHAB Cloud Connector #############################

# The URL of the openHAB Cloud service to connect to.
 # Optional, default is set to the service offered by the openHAB Foundation
 # (https://myopenhab.org/)
 #openhabcloud:baseURL=

# Local port that the openHAB runtime is available through HTTP.
 # Optional, default is 8080
 #openhabcloud:localPort=

# Defines the mode in which you want to operate the connector.
 # Possible values are:
 # - notification: Only push notifications are enabled, no remote access is allowed.
 # - remote: Push notifications and remote access are enabled.
 # Optional, default is 'remote'.
 #openhabcloud:mode=

# A comma-separated list of items to be exposed to external services like IFTTT.
 # Events of those items are pushed to the openHAB Cloud and commands received for
 # these items from the openHAB Cloud service are accepted and sent to the local bus.
 # Optional, default is an empty list.
 openhabcloud:expose=GarageDoorSwitch
- Sign up for a new account at: http://www.myopenhab.org/ You will need your UUID & Secret from /webapps/static/uuid & /webapps/static/secret
- Once your account is active and your install shows up online, you can go into IFTTT
- Once in IFTTT you will need to go here: https://ifttt.com/services/openhab/settings if it doesnt prompt you to connect & authorize, click edit connection.
Needed Accounts
Before we started you will need the following free accounts setup:
my.openHAB: Allows your openHAB install to connect to IFTTT. IFTTT has a specific openHAB service.
You will also want to install the openHAB Android or iOS app.
IFTTT: Allows us to connect the openHAB service to the Alexa Voice.
(You can do this with just MYQ & openHAB 2.0, but 2.0 is still in beta. I will cover doing this with openHAB 1.8.3 Latest Stable)
MYQ: You need to have working MYQ account already setup, and you will need to enter your MYQ logon info into openHAB later.
*Disclaimer: Most if not all links on this page will be Affiliate Links. This helps pay for things like website hosting and more bits & gadgets to write about.
Needed Hardware
Amazon Alexa, Alexa Dot or Alexa Tap (newer FireTVs might work too!)
No products found.No products found.No products found.No products found.
You will either need a MYQ Enabled Chamberlain or Liftmaster Garage Door Opener like this one:
No products found.Or you can add that functionality to most older Chamberlain and Liftmaster Garage Door Openers with this kit for about $78:
No products found.You will also need a computer to run the openHAB software on. I am currently running on my iMac but will soon transfer it to either a Raspberry Pi or a NextThing C.H.I.P.
openHab also runs on Windows but I have not tested it on that platform. From openHAB: https://github.com/openhab/openhab/wiki/Windows
The Easy Way
I have created a zip file with a minimum installation of openHAB with the MYQ Addon already installed. You will need to edit a few files to get it running. Please let me know if you get it to run on windows or have any issues so we can work them out.
Dropbox Link for openhab183.zip:
https://www.dropbox.com/s/rmnhwxc00cr4gtb/openHAB183.zip?dl=0
If you trust me, then you can download this zip file to your computer, unzip it and change a few files.
BUT, If you want to install openHAB yourself from scratch, read through this section anyway to get familiar and then jump to the openhab Manual Install Section to learn how to configure the setup files.
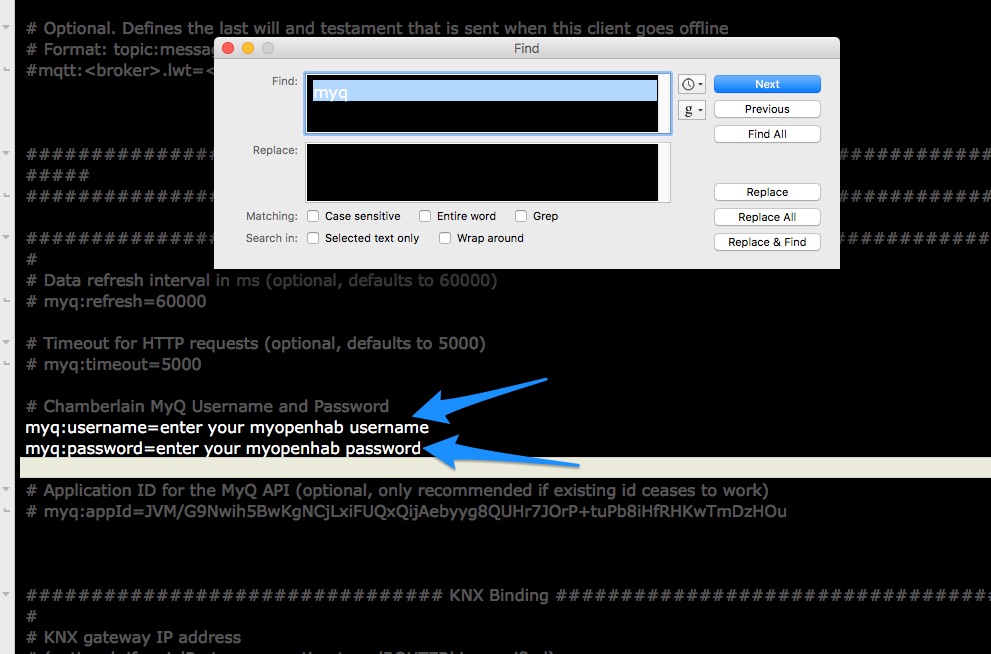
Go to the unzipped folder and edit the /openHAB183/configurations/openhab.cfg file
Do a search for “MYQ” and enter your MyOpenHAB username and password. Then save the file.
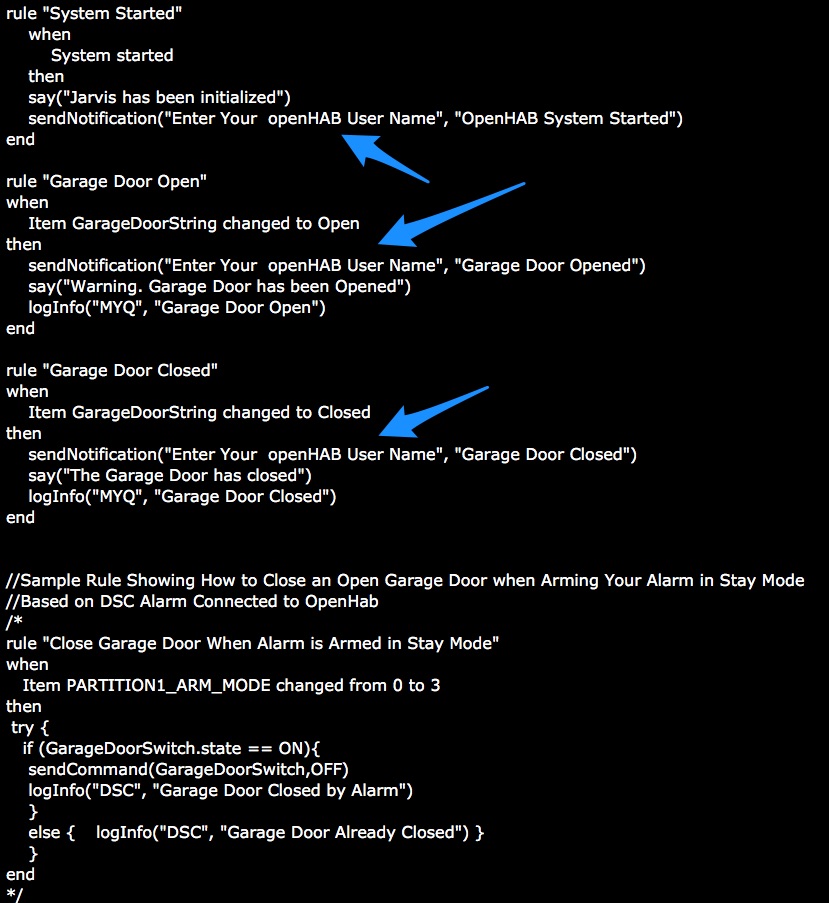
Next go and edit /openHAB183/configurations/rules/default.rules
Here you need to replace “Enter Your openHAB User Name” with your openhab username. For me the username is my email. Keep in inside the quotes.
On a Mac it will also speak notification (If you want) and I have that setup as a default. Feel free to comment any of these lines out (or delete them)if you do not want notifications.
(The MYQ Android & iPhone apps also have push and email notifications.)
I included a commented out rule to show how you could integrate the garage door with other parts of your home automation in case you decide to expand on openHAB.
Make sure to save the file!
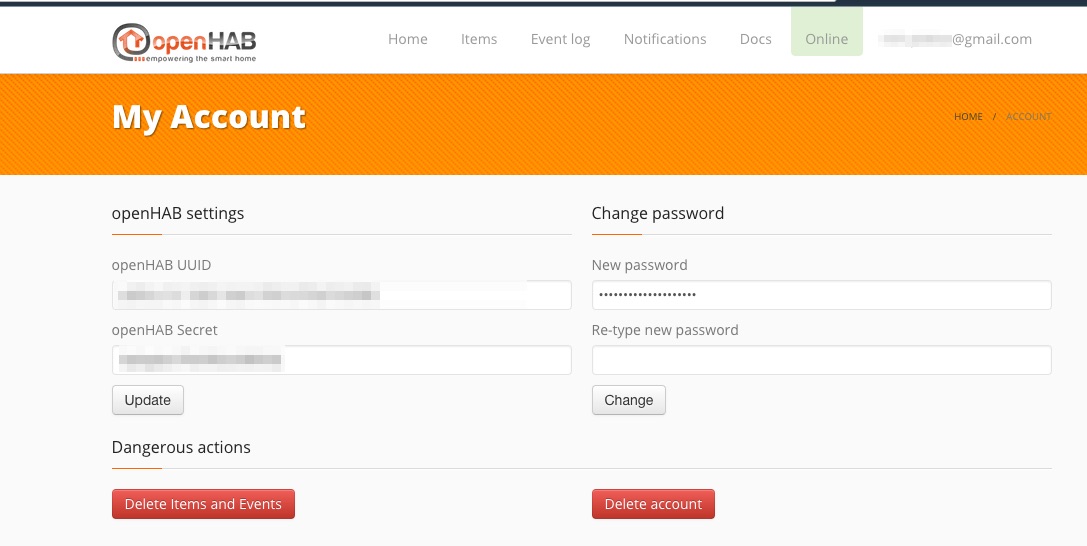
Now, you need to logon to your my.openhab account: https://my.openhab.org/
Click on your username/email in the upper right and the click on account. Here you need to copy your openHAB UUID and your openHAB Secret:
Next, go to the openHAB183/webapps/static folder. In here you will see 2 files, one called secret and one called /openHAB183/configurations/rules/default.rules
Replace Enter-Your-my.openhab-Secret-Here with the secret from your account. Save File!
Replace Enter-Your-my.openhab-UUID-Here with the UUID from your account. Save File!
Now it’s time to fire up openHAB!
You will need to install Java if not already installed. Go to http://java.com/ to get it.
On Windows, you would run the script start.bat located in the openHAB183 folder.
On a Mac or Linux, open a terminal and go to the openHAB183 folder and run this command: ./start.sh
Pay attention as it starts up and make notes of any error messages so we can troubleshoot it.
If everything went well, you should see something similar to this:
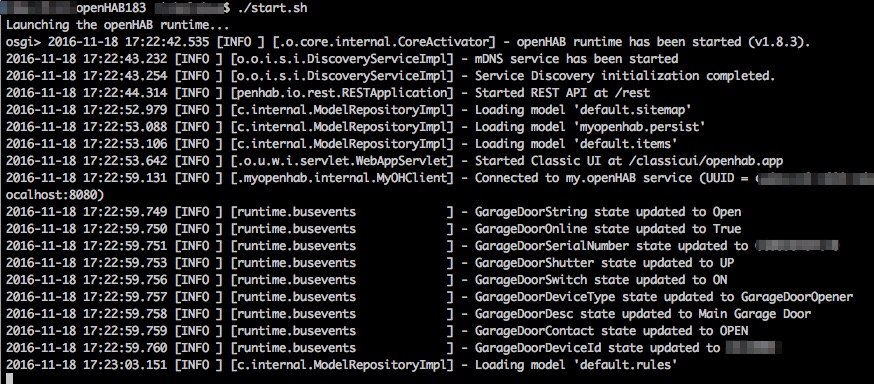
**If you see the line “…Connected to my.openHAB…” then open a web browser and go to the IP Address of the computer you installed openHAB on with the port 8080 added.
For example http://192.168.1.10:8080
You should see a web page like this:
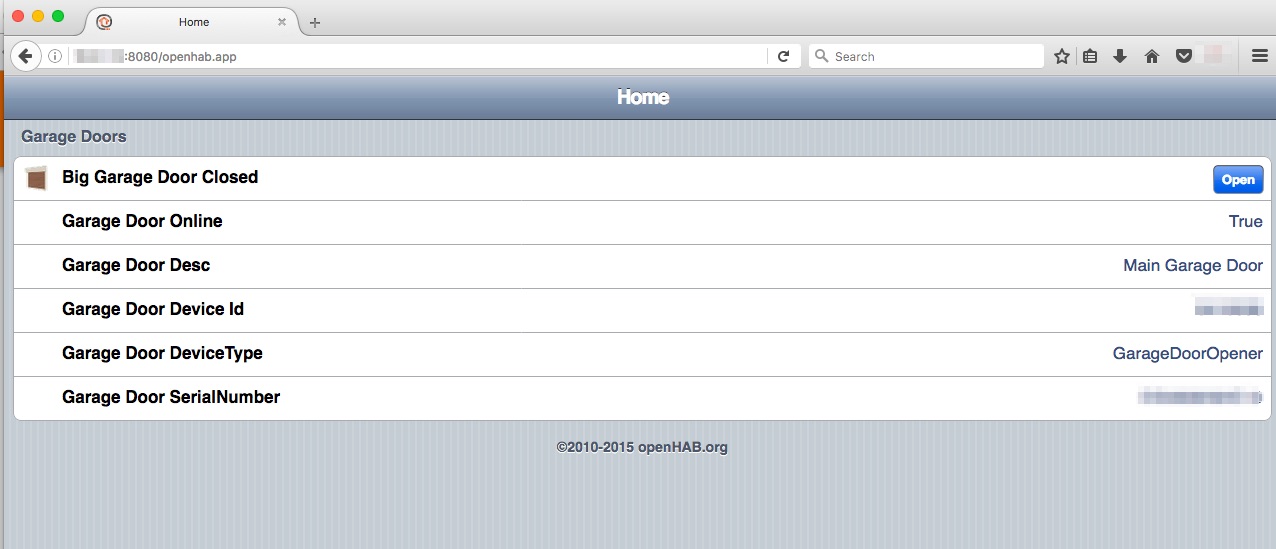
At this point, you should be able to Open and Close your MYQ Garage Door from this webpage(or the openHAB APP if you have installed and set it up).
The first line will change from:
“Big Garage Door Closed” to “Big Garage Door Open” depending on the actual status of your Garage Door(from MYQ).
We can now jump to the “Configuring IFTTT for Alexa & openHAB” section!
The “Not As Easy Way” – openHAB Manual Install
Follow the instructions to install openHAb for your OS platform:
Windows: https://github.com/openhab/openhab/wiki/Windows
OSX / Linux Manual: https://github.com/openhab/openhab/wiki/Linux-and-OS-X#manual-installation-alternative-approach
Basically, you are downloading the Runtime Core from here: http://www.openhab.org/getting-started/downloads.html
Put that file in a folder name and location you can find, and unzip it.
Optionally, you can download and install the appropriate openHAB Designer which makes it easier to make configuration file changes.
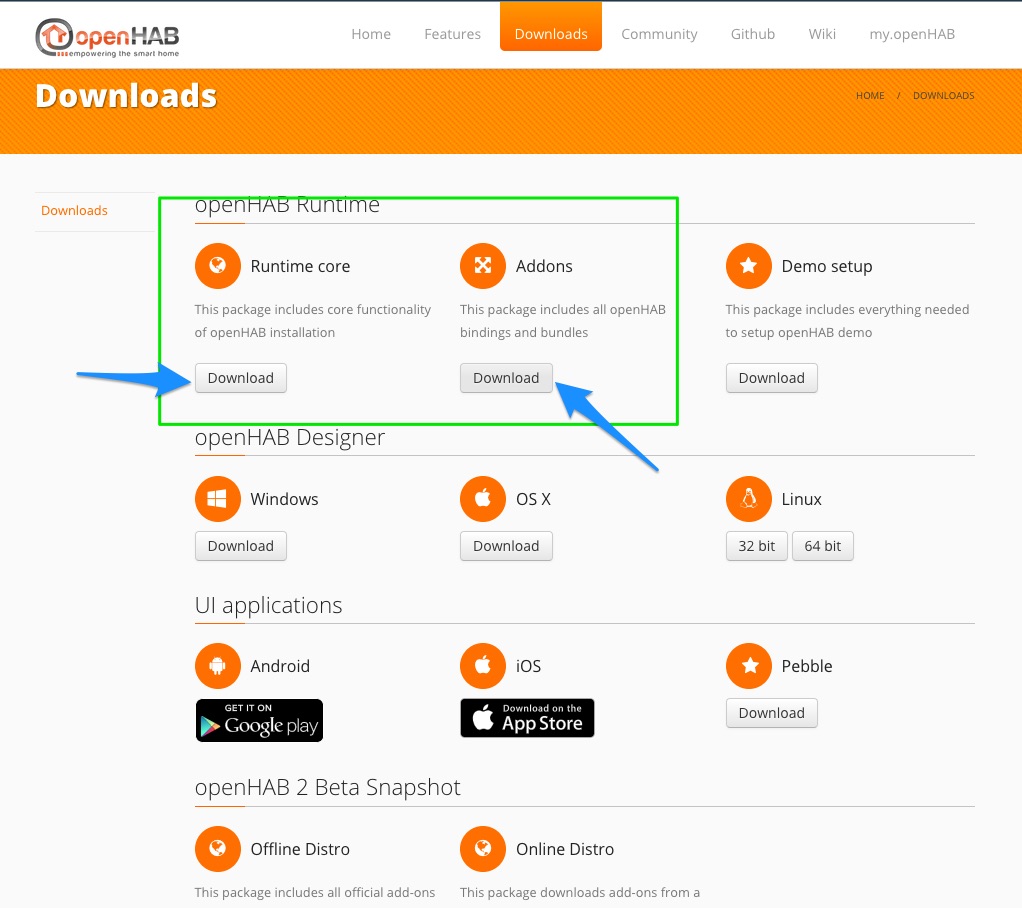
You will also need this Addons file: http://www.openhab.org/getting-started/downloads.html
Unzip this file and copy 5 files from it into the ~/addons/ folder
org.openhab.io.multimedia.tts.marytts-1.8.3.jar
org.openhab.io.myopenhab-1.8.3.jar
org.openhab.io.multimedia.tts.speechdispatcher-1.8.3.jar
org.openhab.io.multimedia.tts.macintalk-1.8.3.jar
org.openhab.binding.myq-1.8.3.jar
If you wanted the updated MYQ Addon that allows more functionality, see this thread: https://community.openhab.org/t/chamberlain-myq-binding/4192/113
You will need to create/edit several files in the folder you unzipped to ~
 ~/configurations/openhab.cfg
 ~/configurations/rules/default.rules
 ~/configurations/items/default.items
 ~/configurations/rules/default.sitemap
 ~/configurations/persistence/myopenhab.persist
See edits below:
~/configurations/openhab.cfg
 ############################## Chamberlain MyQ Binding ##############################
 #
 # Data refresh interval in ms (optional, defaults to 60000)
 # myq:refresh=60000

 # Timeout for HTTP requests (optional, defaults to 5000)
 # myq:timeout=5000

 # Chamberlain MyQ Username and Password
 myq:username=enter your myopenhab username
 myq:password=enter your myopenhab password
~/configurations/rules/default.rules
rule "System Started"
 when
 System started
 then
 say("Jarvis has been initialized")
 sendNotification("Enter Your openHAB User Name", "OpenHAB System Started")
 end

rule "Garage Door Open"
 when
 Item GarageDoorString changed to Open
 then
 sendNotification("Enter Your openHAB User Name", "Garage Door Opened")
 say("Warning. Garage Door has been Opened")
 logInfo("MYQ", "Garage Door Open")
 end

rule "Garage Door Closed"
 when
 Item GarageDoorString changed to Closed
 then
 sendNotification("Enter Your openHAB User Name", "Garage Door Closed")
 say("The Garage Door has closed")
 logInfo("MYQ", "Garage Door Closed")
 end

//Sample Rule Showing How to Close an Open Garage Door when Arming Your Alarm in Stay Mode
 //Based on DSC Alarm Connected to OpenHab
 /*
 rule "Close Garage Door When Alarm is Armed in Stay Mode"
 when
 Item PARTITION1_ARM_MODE changed from 0 to 3
 then
 try {
 if (GarageDoorSwitch.state == ON){
 sendCommand(GarageDoorSwitch,OFF)
 logInfo("DSC", "Garage Door Closed by Alarm")
 }
 else { logInfo("DSC", "Garage Door Already Closed") }
 }
 end
 */
~/configurations/items/default.items
Group gMyOpenHAB
/*MYQ Garage*/
Group Garages
Switch GarageDoorSwitch “Garage Door Open” (Garages, gMyOpenHAB) { myq=”0″ }
String GarageDoorString “Garage Door [%s]” (Garages, gMyOpenHAB) { myq=”0″ }
Contact GarageDoorContact “Garage Door [%s]” <contact> (Garages, gMyOpenHAB) { myq=”0″ }
Rollershutter GarageDoorShutter “Garage Door Open” (Garages, gMyOpenHAB) { myq=”0″ }
//The Following Items Do Not Work with the 1.8.3 version of the MYQ Addon jar file
/* String GarageDoorDesc “Garage Door Desc [%s]” (Garages) { myq=”0#desc” }
String GarageDoorOnline “Garage Door Online [%s]” (Garages) { myq=”0#online” }
String GarageDoorDeviceId “Garage Door Device Id [%s]” (Garages) { myq=”0#MyQDeviceId” }
String GarageDoorDeviceType “Garage Door DeviceType [%s]” (Garages) { myq=”0#MyQDeviceTypeName” }
String GarageDoorSerialNumber “Garage Door SerialNumber [%s]” (Garages) { myq=”0#SerialNumber” } */
~/configurations/sitemap/default.sitemap
sitemap default label="Home"
{

 Frame label="Garage Doors" {

     Switch item=GarageDoorSwitch icon="garagedoor-closed" label="Garage Door Closed" visibility=[GarageDoorContact=="CLOSED"] mappings=[ON="Open"]
     Switch item=GarageDoorSwitch icon="garagedoor-open" label="Garage Door Open" visibility=[GarageDoorContact=="OPEN"] mappings=[OFF="Close"]
     Text item=GarageDoorString icon="garagedoor" label="Garage Door [%s]" visibility=[GarageDoorString=="CLOSING"]
     Text item=GarageDoorString icon="garagedoor-ajar" label="Garage Door [%s]" visibility=[GarageDoorString=="OPENING"]
  //The Following Items Do Not Work with the 1.8.3 version of the MYQ Addon jar file
  /* Text item=GarageDoorOnline
     Text item=GarageDoorDesc
     Text item=GarageDoorDeviceId
     Text item=GarageDoorDeviceType
     Text item=GarageDoorSerialNumber */
    }
}
~/configurations/persistence/myopenhab.persist
// persistence strategies have a name and a definition and are referred to in the "Items" section
Strategies {
 default = everyChange
}
Items {
 gMyOpenHAB*,Garages* : strategy = everyChange
 }
When you are done with all of that, follow the rest of the “Easy Way” instructions starting from here: Easy Way – My openHAB
Configuring IFTTT for Alexa & openHAB
After you have opened and closed your Garage Door through openHAB and before we configure, IFTTT, we need to login to my.openHAB and make sure the events are registering.
Once logged into my.openhab, make sure you are “Online” and then click on the Event Log.
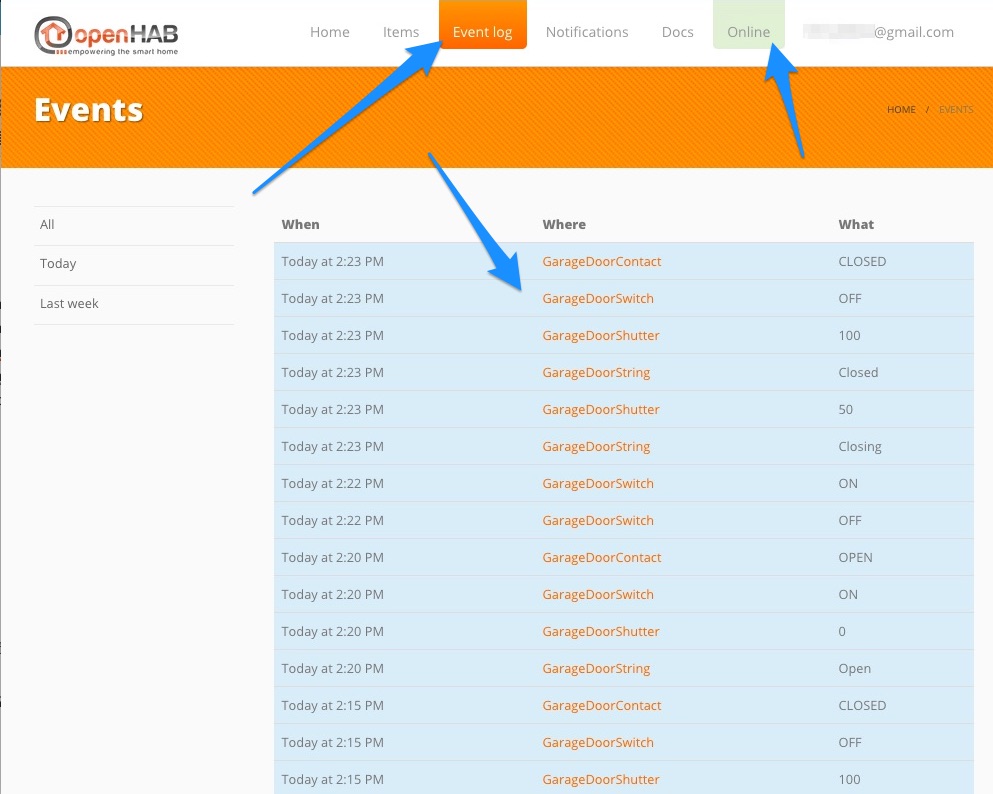
You should see several events registered in the log. If you do we can move on to configuring IFTTT.
Login to IFTTT: https://ifttt.com/
Go the Alexa service and connect your Alexa account to it: https://ifttt.com/amazon_alexa
Go the openHAB and connect your my.openHAB account: https://ifttt.com/openhab
Create a new Applet: https://ifttt.com/create
For the +THIS part, choose Alexa.
For the Choose Trigger, click on “Say a specific phrase”. Pick a phrase you will easily remember such as “open garage”
For the +That part, choose openHAB
For Choose action, pick “Send a command”
Under “Complete Action Fields”, the item will be “GarageDoorSwitch”
Under “Command to send”, enter “ON”
Save it.
Repeat the process for closing the Garage Door, changing the phrase to “close garage” (or whatever you want) and the Command to send will be “OFF”.
Now it’s time to test!
“Alexa, Trigger Open Garage”
“Alexa, Trigger Close Garage”
[ratings]