
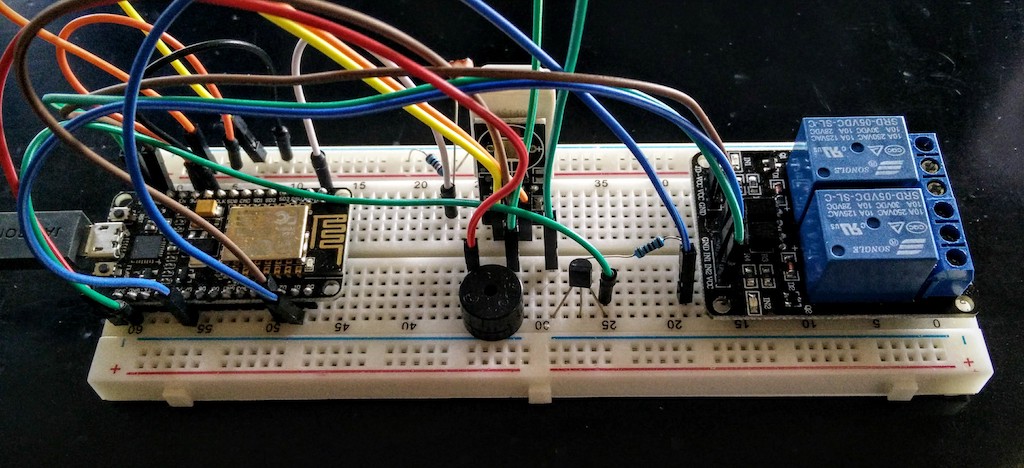
ESP8266 NodeMCU WiFi IoT Garage Door Opener Relay with Cayenne
Wait! Didn’t you already do a post on an ESP8266 NodeMCU Garage Door Opener? Yup, I did! But for that post here we used the online IoT service/app Blynk. This new post makes some additions and also explores a new online IoT service called Cayenne. As a matter of fact, I have at least 2 more ESP8266 Garage Door posts planned as I feel it’s a great project to test out these IoT platforms. The next one will likely be using thinger.io and the fourth one will probably be using the Homie MQTT Framework. I am open to suggestion for other platforms to try out!
(Cayenne was offering $50 Participation Prize for Projects using Cayenne submitted in September & October: http://www.cayenne-mydevices.com/resources/articles/announcing-cayennes-maker-contest-50-participation-prize-200-grand-prize/ although I did not enter it.)
A few changes since the ESP8266 NodeMCU Relay WiFi Garage Door Opener with Blynk post:
- Added DHT22/AM3202 Temperature & Humidity Sensor
- Added Gl5537 Light Sensor
- Added MQTT to send data to my OpenHab install.
- Added ability for OpenHab to also open/control the Garage Door.
I should note again that my install and code is specific for a Marantec Garage Door Opener. You may need to modify this code for your particular Garage Door Opener and this will likely void your warranty!
Here’s a video of it in action:
*Disclaimer: Most if not all links on this page will be Affiliate Links. This helps pay for things like website hosting and more bits & gadgets to write about.
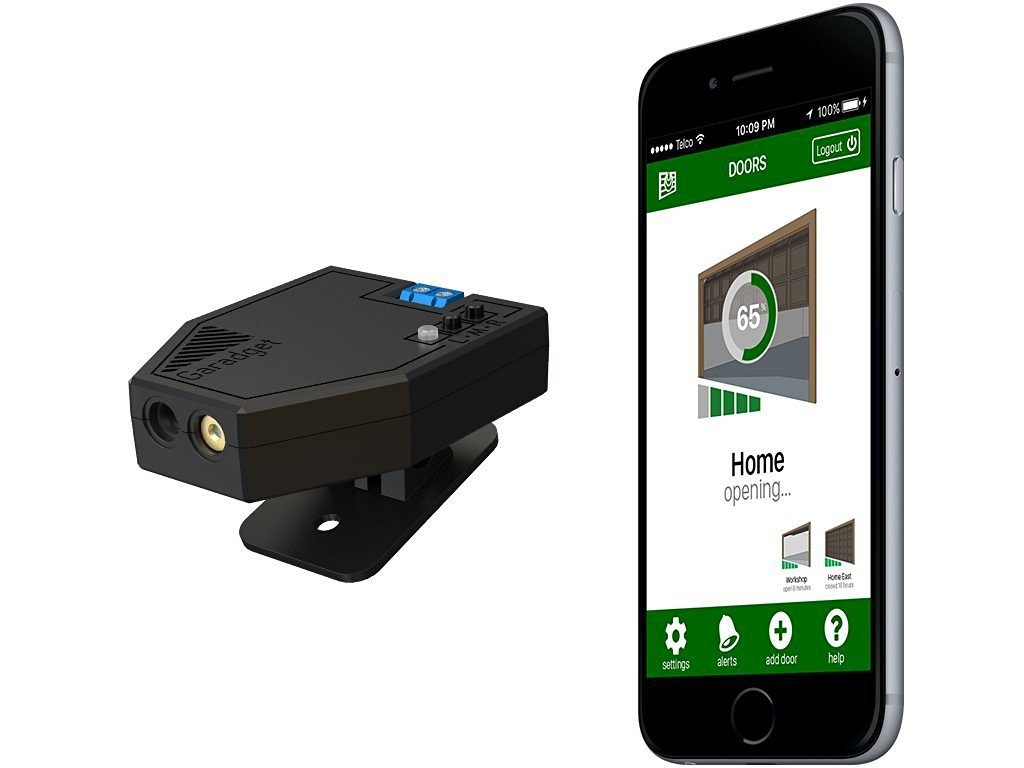
If after reading this post, you decide that you don’t want to DIY, but you DO want to stick with an Open Source solution, then please check out Garadget by SoftComplex (shown above) which is based on the Particle Photon! There is even a Garadget Addon Binding for OpenHab and Garadget now has an Alexa Skill -> “Alexa, tell Garadget to close all the doors.”
ESP8266 NodeMCU WiFi IoT Garage Door Opener Relay with MQTT & Cayenne
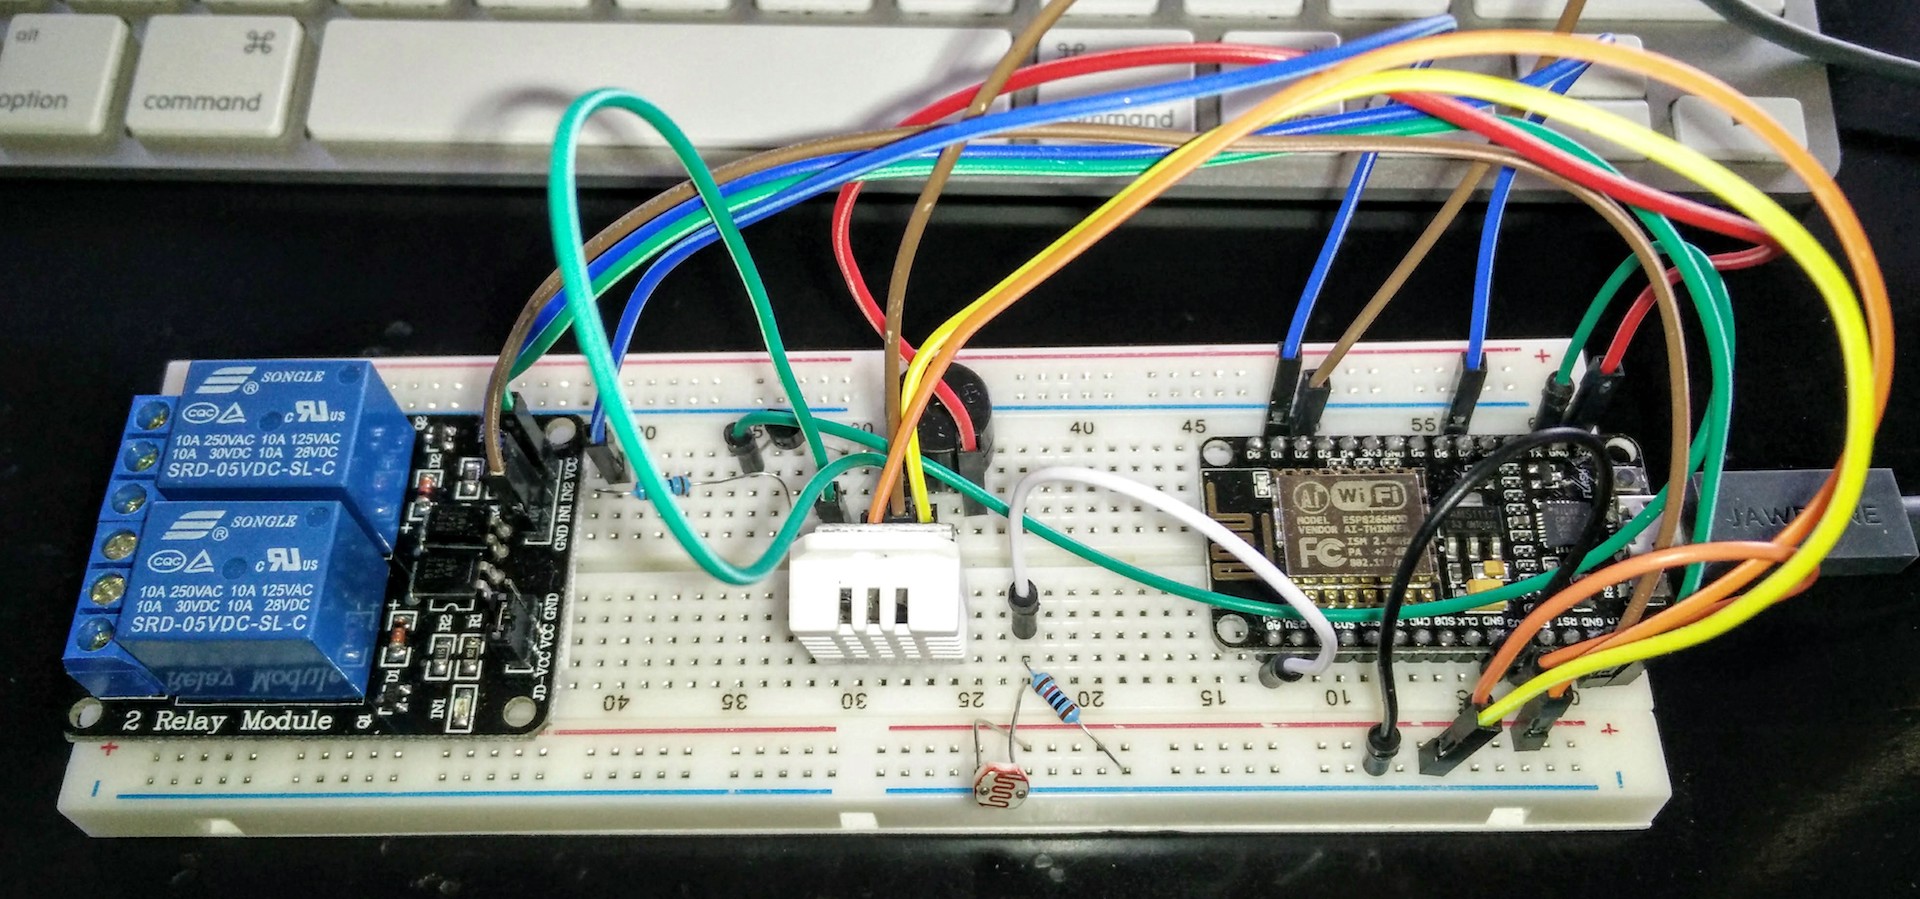
Parts List:
ESP8266 NodeMCU HiLetgo new Version from Amazon $8
Uxcell a13071200ux0770 Relay Shield Module $4.99 from Amazon.
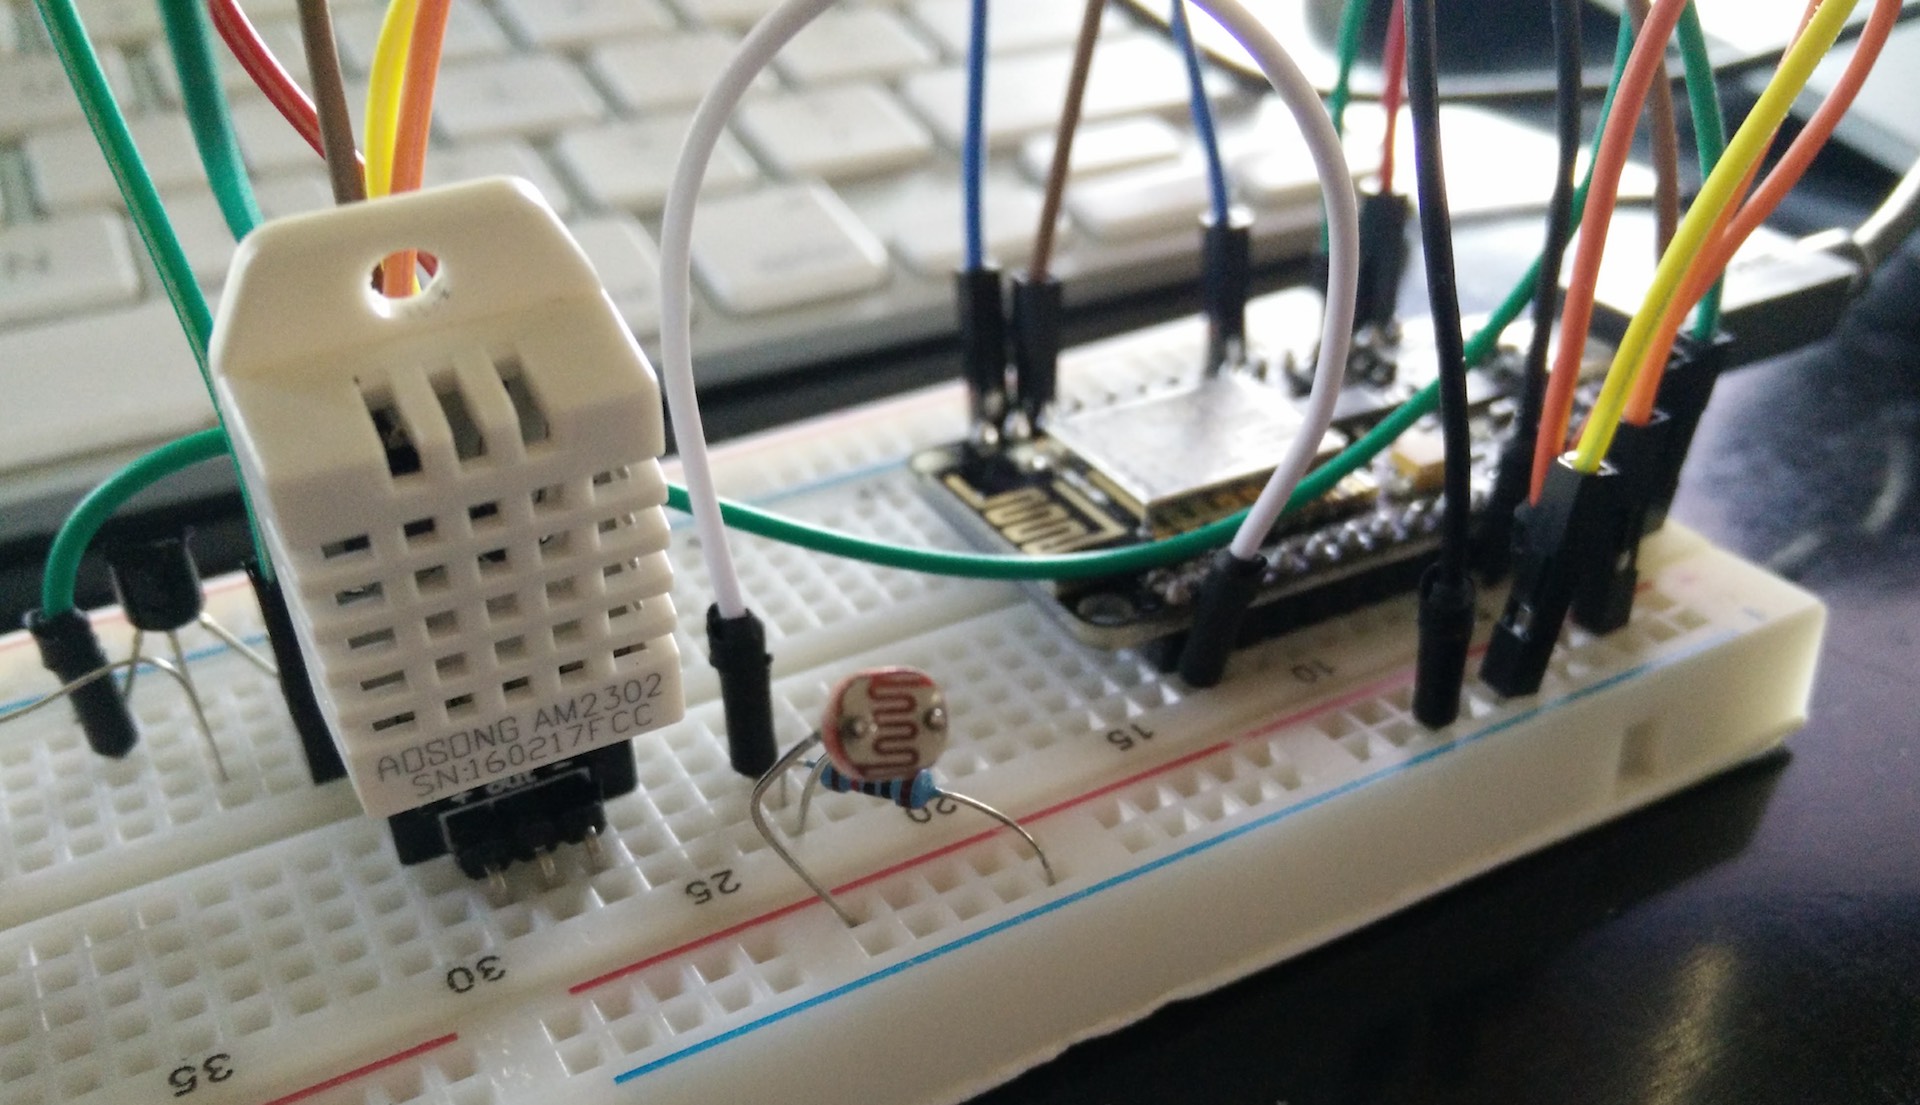
DHT22 or AM2302 Temperature/Humidity Sensor $9.99 for version with built in pull up resistor
GL5537 Light Sensor $6.99 or cheaper for 20 units
10K Resistor for Gl5537 Light Sensor
1K Resistor for Active Buzzer
Assorted Breadboards – I bought a pack on Amazon for $10.99 but you probably have a few extra laying around.
Ksmile 20M 20AWG 66ft Extension Cable Wire Cord for Led Strips Single Colour 3528 5050, 2 Pin Red/Black Hookup Wire 12V DC to connect to Garage Door Opener.
(I only needed about 1 foot and you may already have suitable wire laying around.)
3M Scotch Heavy Duty Mounting Tape, 1-Inch by 125-Inch (314) holds up to 5 lbs – $4.39 on Amazon
I also used an Active Buzzer I had from this SunFounder Project Super Starter Kit for Raspberry Pi 3, 2 & Model B+ but you can purchase buzzer by itself for a lot cheaper without the kit.( 10 Active buzzers for $8 on Amazon )
I am using my Alarm Sensor which is connected to OpenHab Home Automation to let me know if the door is opened or closed, but you may want to add something like this Security Garage Door Rolling Gate Magnet Alarm Reed Switch and connect it to the ESP8266 to know if the door is opened or closed. I plan to add one soon as a back up to my alarm sensor.
I like to use Amazon Prime for parts because I am impatient, but you can probably save some money if you order a lot of these parts from Ebay, Bangood or AliExpress.

Cayenne tout’s themselves as the “The World’s First Drag-and-Drop IoT Project Builder”. They have a web-based dashboard as well as Android and iOS app. The latter is important to me as I’d like to be able to control and monitor my IoT things when I’m not home. They also have SMS & Email alerts based on triggered events; i.e. text me if the garage door is opened.
I am not using the Scheduling function in this Garage Door project but do see where it could be useful.
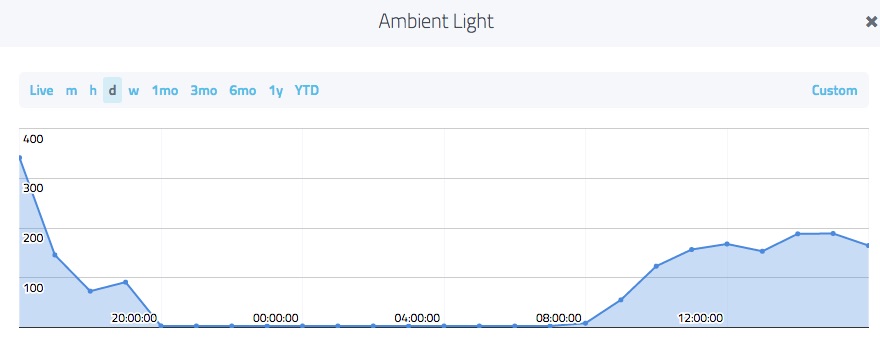
I do really like the data graphing!
Right now you can sign up for a FREE Beta account here: https://www.cayenne-mydevices.com/signup/
I asked and Cayenne told me they may add some optional freemium-style pricing, but the actual product will stay gratis for makers and devs. “We make money by licensing to companies and white labeling.”
The Cayenne Dashboard supports setting up a Raspberry Pi or an Arduino. There is no specific ESP8266 device, but choosing Arduino Uno with WiFi Shield works for me.
Cayenne will give you a TOKEN which you will need to input into the Arduino sketch.
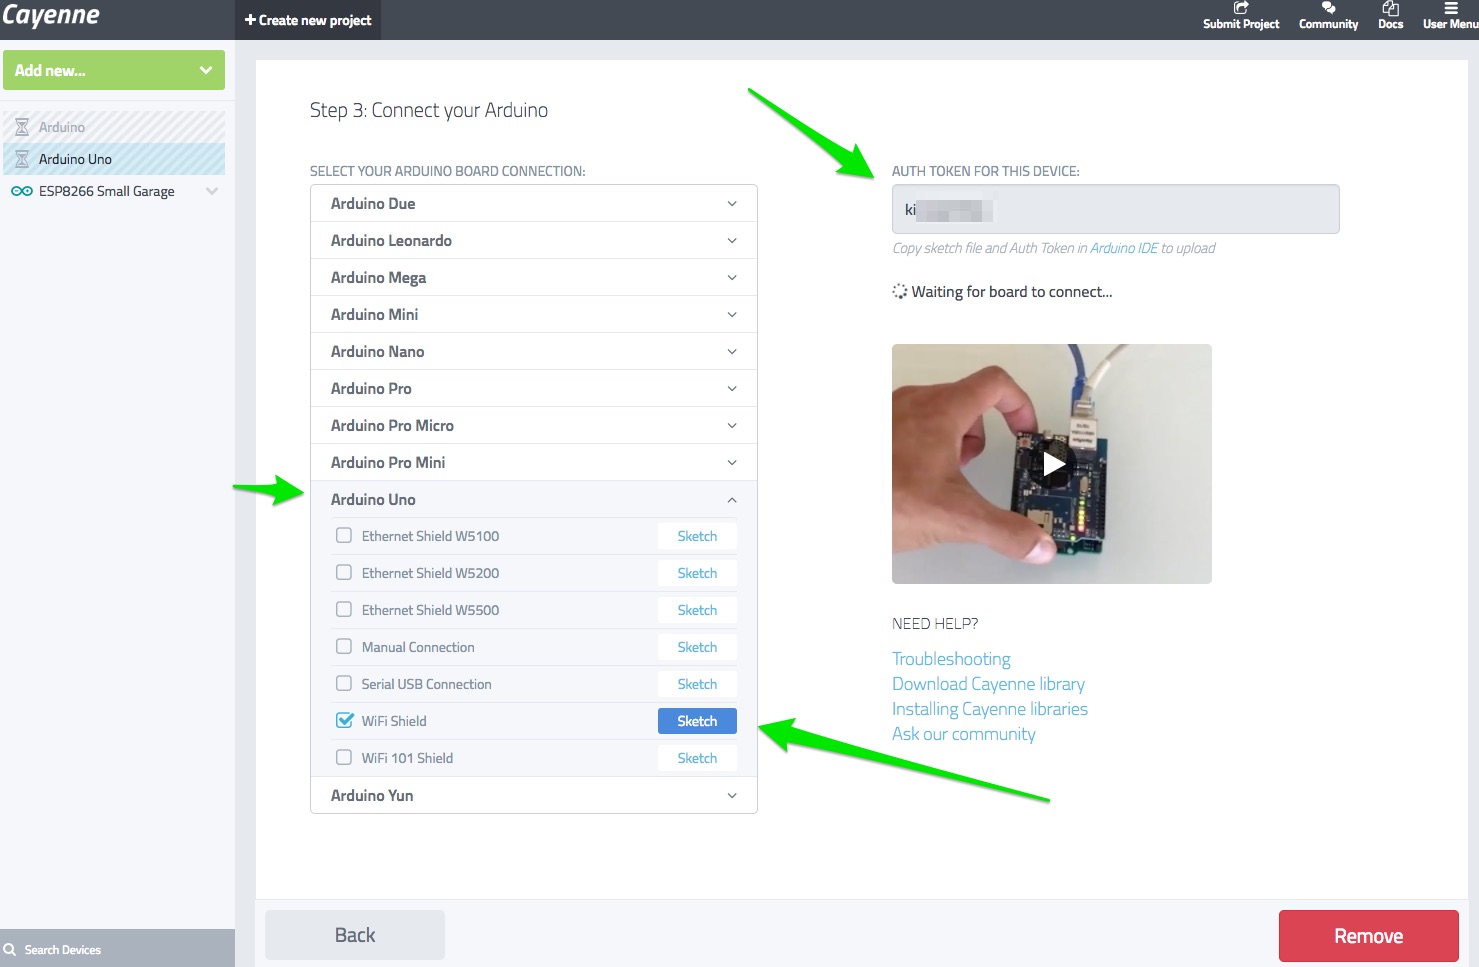
List of official support hardware is here: https://www.cayenne-mydevices.com/Supported-Hardware/
Cayenne requires the Blynk libraries along with the Cayenne libraries.
My #includes for this project look like this(I’ll post the entire code a little further down):
#define CAYENNE_PRINT Serial  // Comment this out to disable prints and save space

#include <ESP8266WiFi.h>
#include "CayenneDefines.h"
#include "BlynkSimpleEsp8266.h"
#include "CayenneWiFiClient.h"

#include <Wire.h>
#include <PubSubClient.h>
#include <DHT.h>
#define DHTTYPE DHT22
#define DHTPIN 4
#define VIRTUAL_PIN V1
#define VIRTUAL_PIN V2
#define VIRTUAL_PIN V3
#define VIRTUAL_PIN V4
#define VIRTUAL_PIN V5
#define VIRTUAL_PIN V6
#define REST 1000 //Rest Between Inhalations.
Similar to Blynk, you can read and write to Virtual Pins. To write my Temperature and Humidity values to Cayenne the code looks like this:
    String TempF;
    String Humid;
    TempF = String(temp_f);
    Humid = String(humidity);
    Cayenne.virtualWrite(V1, temp_f);
    Cayenne.virtualWrite(V2, humidity);
To send a command from Cayenne to my ESP8266 to trigger the garage door relay the code looks like this:
CAYENNE_IN(V3)
{
  // get value sent from dashboard
  int currentValue = getValue.asInt(); // 0 to 1

  // assuming you wire your relay as normally open
  if (currentValue == 0) {
    digitalWrite(13, HIGH);
  } else {
    CloseGarage();
    }
}

void CloseGarage() {
  //Beep Buzzer & Flash Lights
     unsigned char i, j ;// define variables
      for (i = 0; i <12; i++)
      {
      digitalWrite (buzzer, LOW) ; // Turn buzzer ON
      delay (300) ;// Delay 10ms
      digitalWrite (buzzer, HIGH) ;// turn buzzer OFF
      delay (75) ;// delay 10ms
    }
      for (i = 0; i <15; i++)
      {
      digitalWrite(13, LOW); // GPIO13 Closes Relay
      digitalWrite (buzzer, LOW) ; // Turn buzzer ON
      delay (75) ;// Delay 10ms
      digitalWrite(13, HIGH);
      digitalWrite (buzzer, HIGH) ;// turn buzzer OFF
      delay (150) ;// delay 10ms
      }
      delay(1500);
      Serial.println("Closing Garage!");
      digitalWrite(13, LOW); //Close Relay = Close Garage Door
      delay(750);
      digitalWrite(13, HIGH);
}
Pretty simple right? On the Cayenne Dashboard, you will reference the same Virtual Pins to display you Data in a widget or activate a button.
While Cayenne has many built-in devices and sensors, for me it worked better creating a generic widget and choosing the appropriate virtual pin as shown below:
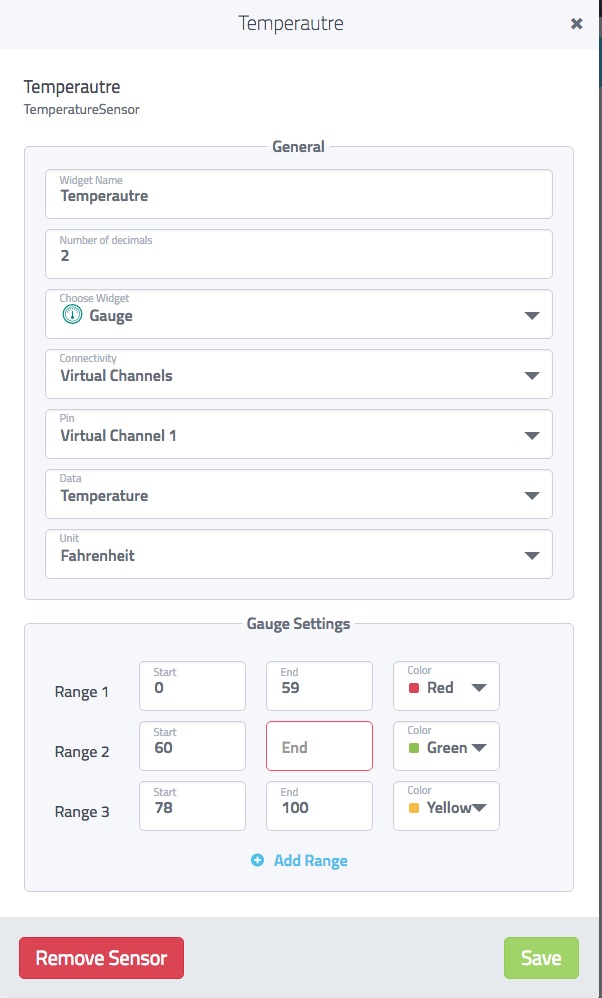
I like the ability to set colors for different temperature ranges. I would like to see some “cold” oriented colors such as blue added.
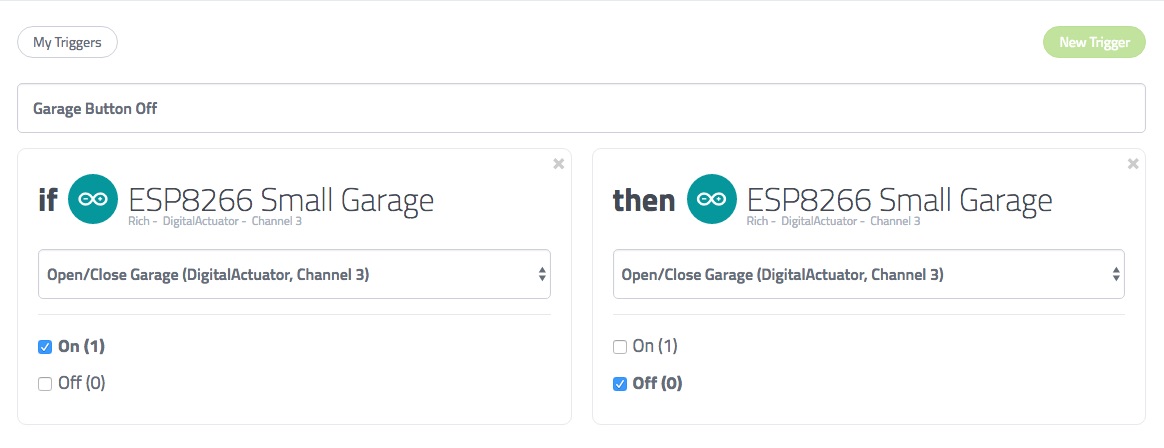
At the time I set up this project, Cayenne had an On/Off Switch but not a momentary switch which is what I wanted to activate the Garage Door. I found a work around using their Trigger functionality.
When the switch is turned on, turn it off! Simple! I think with future improvements to Cayenne we could have a button that says “Close” when the Garage Door is open and “Open” when the Garage Door is closed. If Cayenne adds this functionality, I will update this post.
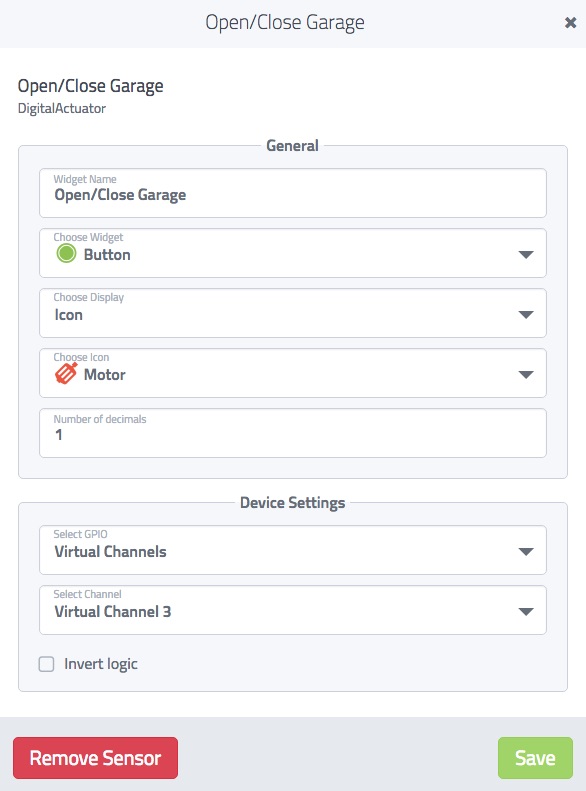
Here are my widget settings for the button:
My sketch below includes using MQTT but you do NOT need this to use it with Cayenne. I use MQTT to also use the ESP8266 with my OpenHab Home Automation install. Also, Cayenne is working on there implementation which will hopefully be available soon.
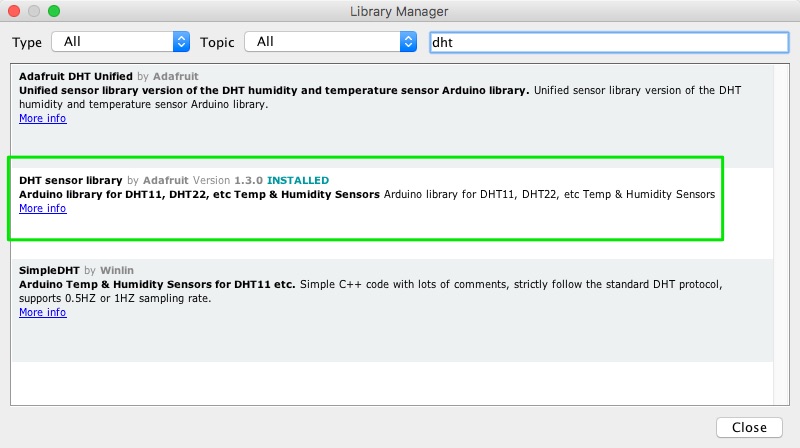
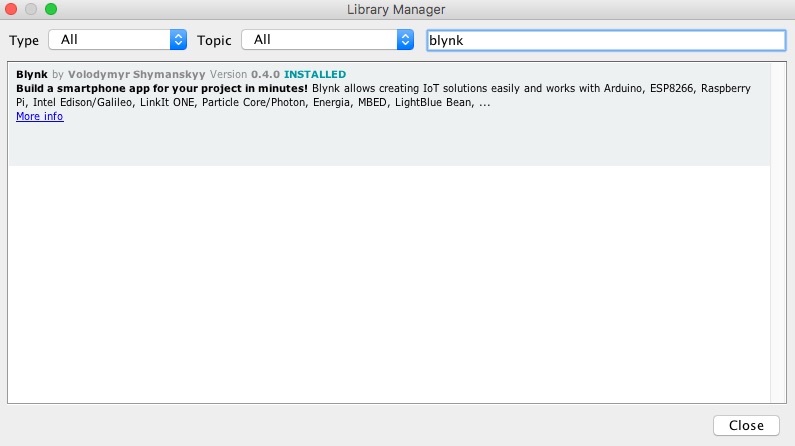
You will need to install the following Arduino Libraries: DHT, Blynk, Cayenne, PubSubClient MQTT(PubSubClient not needed if you ar NOT using MQTT):


After you have those libraries installed, here is the entire sketch for this project.
*Note: If you are not using MQTT, then click here use this Non-MQTT Sketch instead.
The Fritzing Wiring can be found below the code.
/*   ********************************************************************************************
          Garage Door Opener with Warning Light and Buzzer for Marantec with Cayenne IoT
          Author: Rich Plakas / Austin, TX - USA
          Reviewed: October 31, 2016
 *   ********************************************************************************************
*/
#define CAYENNE_PRINT Serial  // Comment this out to disable prints and save space

#include <ESP8266WiFi.h>
#include "CayenneDefines.h"
#include "BlynkSimpleEsp8266.h"
#include "CayenneWiFiClient.h"

#include <Wire.h>
#include <PubSubClient.h> //mqtt
#include <DHT.h>
#define DHTTYPE DHT22
#define DHTPIN 4
#define VIRTUAL_PIN V1
#define VIRTUAL_PIN V2
#define VIRTUAL_PIN V3
#define VIRTUAL_PIN V4
#define VIRTUAL_PIN V5
#define VIRTUAL_PIN V6
#define REST 1000    //Rest Between Inhalations.

int lightPin = 0;  //define a pin for Photo resistor
int buzzer = 5 ;// connect the I/O pin on the buzzer to this

// MQTT Server
const char* mqtt_server = "192.168.1.100"; //Your MQTT Server IP

DHT dht(DHTPIN, DHTTYPE, 20);
float humidity, temp_f;  // Values read from sensor - See more at: http://www.esp8266.com/viewtopic.php?f=29&t=8746#sthash.X8sbMBjM.dpuf

// Generally, you should use "unsigned long" for variables that hold time
unsigned long previousMillis = 0;
unsigned long lastTempUpdate = 0;
const long interval = 5000;

// Cayenne authentication token. This should be obtained from the Cayenne Dashboard.
char token[] = "Your Cayenne Access Token";
// Your network name and password.
char ssid[] = "Your WiFI Access Pont Name";
char password[] = "Your WiFi Password";

// MQTT
WiFiClient espClient;
PubSubClient client(espClient);
long lastMsg = 0;
char msg[50];
char msgF[50];
char msgH[50];
int value = 0;

int gState = 0;
long rssi;
IPAddress ip;
char message_buff[100];

void callback(char* topic, byte* payload, unsigned int length) {
  int i = 0;
  for (i = 0; i < length; i++) {
    message_buff[i] = payload[i];
  Serial.print((char)payload[i]);
   }
  Serial.println();
  message_buff[i] = '\0';
  String msgString = String(message_buff);
  Serial.println("Inbound: " + String(topic) +":"+ msgString);
  Serial.println();

  // Display Current Garage Door Status from DSC - OpenHab

  if ( msgString == "OPEN" ) {
      OpenGarage();
      Serial.print("Opening from MQTT");
    }
  else if ( msgString == "CLOSE" ) {
      CloseGarage();
      Serial.println("Closing from MQTT!");
  }
  else if ( msgString == "OPENED" ) {
      Serial.println("Garage Status Update: Open. Setting gState to 1");
      gState = 1;
  }
  else if ( msgString == "CLOSED" ) {
      Serial.println("Garage Status Update: Closed. Setting gState to 2");
      gState = 2;
  }
  else {
      Serial.print("No MQTT Update Recognized: ");
      Serial.println(msgString);
      gState = 0;
  }
  Serial.print("MQTT gState:");
  Serial.println(gState);
}

void reconnect() {
  // Loop until we're reconnected
  while (!client.connected()) {
    Serial.print("Attempting MQTT connection...");
    // Attempt to connect
    if (client.connect("ESP8266Client")) {
      Serial.println("connected");
      // Once connected, publish an announcement...
    //  client.publish("outTopic", "hello world");
      // ... and resubscribe
      client.subscribe("sm_garage/relay1");
      client.subscribe("sm_garage/status");
    } else {
      Serial.print("failed, rc=");
      Serial.print(client.state());
      Serial.println(" try again in 5 seconds");
      // Wait 5 seconds before retrying
      delay(5000);
    }
  }
}


void setup()
{
  digitalWrite(13, HIGH); //GPIO13
  pinMode(13, OUTPUT);       // Pin connected to the Relay
  digitalWrite(5, HIGH); //GPIO5
  pinMode(buzzer, OUTPUT);       // Pin connected to the Buzzer
  Serial.begin(230400);
  Cayenne.begin(token, ssid, password);
  //MQTT
  client.setServer(mqtt_server, 1883);
  client.setCallback(callback);
  client.subscribe("sm_garage/relay1");
  client.subscribe("sm_garage/status");
  dht.begin();
  Serial.print("Setup Gstate:");
  Serial.println(gState);
}


// ==============( Void Loop  ) ====================================

void loop() {

  if (!client.connected()) {
    reconnect();
  }
  client.loop();
  Cayenne.run();
  unsigned long now = millis();
  if ( now - lastTempUpdate > 60000 ) {
    String MyIp;
    String Both;
    MyIp =  "IP: " + String(WiFi.localIP()[0]) + "." + String(WiFi.localIP()[1]) + "." + String(WiFi.localIP()[2]) + "." + String(WiFi.localIP()[3]);
    String MyWiFi;
    MyWiFi = "WiFi: " + String(WiFi.RSSI());
    Serial.println(MyIp);
    Serial.println(MyWiFi);
    gettemperature();
    Serial.print("Sending temperature:");
    Serial.println(temp_f);
    dtostrf(temp_f , 3, 2, msgF);
    client.publish("sm_garage/temperature", msgF);
    //gettemperature();
    Serial.print("Sending humidity:");
    Serial.println(humidity);
    dtostrf(humidity , 2, 2, msgH);
    client.publish("sm_garage/humidity", msgH);
    lastTempUpdate = now;
    Serial.print("Loop Garage State: ");
    Serial.println(gState);
    switch (gState) {
       case 1:
       Cayenne.virtualWrite(V4, 100);
       break;
       case 2 :
       Cayenne.virtualWrite(V4, 0);
       break;
       default:
       Cayenne.virtualWrite(V4, 50);
       break;
    }
  }

}

void gettemperature() {
  // Wait at least 2 seconds seconds between measurements.
  // if the difference between the current time and last time you read
  // the sensor is bigger than the interval you set, read the sensor
  // Works better than delay for things happening elsewhere also
  /*unsigned long currentMillis = millis();

  if(currentMillis - previousMillis >= interval) {
    // save the last time you read the sensor
    previousMillis = currentMillis;   */

    // Reading temperature for humidity takes about 250 milliseconds!
    // Sensor readings may also be up to 2 seconds 'old' (it's a very slow sensor)
    humidity = dht.readHumidity();<          // Read humidity (percent)
    temp_f = dht.readTemperature(true);     // Read temperature as Farenheight


    // Check if any reads failed and exit early (to try again).
    if (isnan(humidity) || isnan(temp_f)) {
      Serial.println("Failed to read from DHT sensor!");
      return;
    }
    String TempF;
    String Humid;
    TempF = String(temp_f);
    Humid = String(humidity);
    Cayenne.virtualWrite(V1, temp_f);
    Cayenne.virtualWrite(V2, humidity);

    int lightsensor = analogRead(lightPin);
    float voltage = lightsensor;

    Cayenne.virtualWrite(V6, voltage);
    Serial.print("Ambient Light: ");
    Serial.println(analogRead(lightPin));
    Serial.print("Luminosity: ");
    Serial.println(voltage);
}

CAYENNE_IN(V3)
{
  // get value sent from dashboard
  int currentValue = getValue.asInt(); // 0 to 1

  // assuming you wire your relay as normally open
  if (currentValue == 0) {
    digitalWrite(13, HIGH);
  } else {
    CloseGarage();
    }
}

void CloseGarage() {
  //Beep Buzzer & Flash Lights to warn about Garage Door Closing
     unsigned char i, j ;// define variables
      for (i = 0; i <12; i++)
      {
      digitalWrite (buzzer, LOW) ; // Turn buzzer ON
      delay (300) ;// Delay 300ms
      digitalWrite (buzzer, HIGH) ;// turn buzzer OFF
      delay (75) ;// delay 75ms
    }
      for (i = 0; i <15; i++)
      {
      digitalWrite(13, LOW); // GPIO13 Closes Relay
      digitalWrite (buzzer, LOW) ; // Turn buzzer ON
      delay (75) ;// Delay 75ms to turn Garage Door Light Onn/Off
      digitalWrite(13, HIGH);
      digitalWrite (buzzer, HIGH) ;// turn buzzer OFF
      delay (150) ;// delay 150ms
      }
      delay(1500);
      Serial.println("Closing Garage!");
      digitalWrite(13, LOW); //Close Relay = Close Garage Door
      delay(750);
      digitalWrite(13, HIGH);
}

void OpenGarage() {
      Serial.println("Opening Garage!"); //
      digitalWrite(13, LOW); //Close Relay = Close Garage Door
      delay(750);
      digitalWrite(13, HIGH);
}
Have the Arduino Serial Monitor Open before you upload the Sketch. After uploading you should see something similar to this in the Serial Monitor:
[10013] Connecting to "Your Access Point Name"
[18517] Connected to WiFi
[18517] My IP: 192.168.1.11
Setup Gstate:0
[18517] Connecting to arduino.mydevices.com:8442
[21878] Ready (ping: 1117ms).
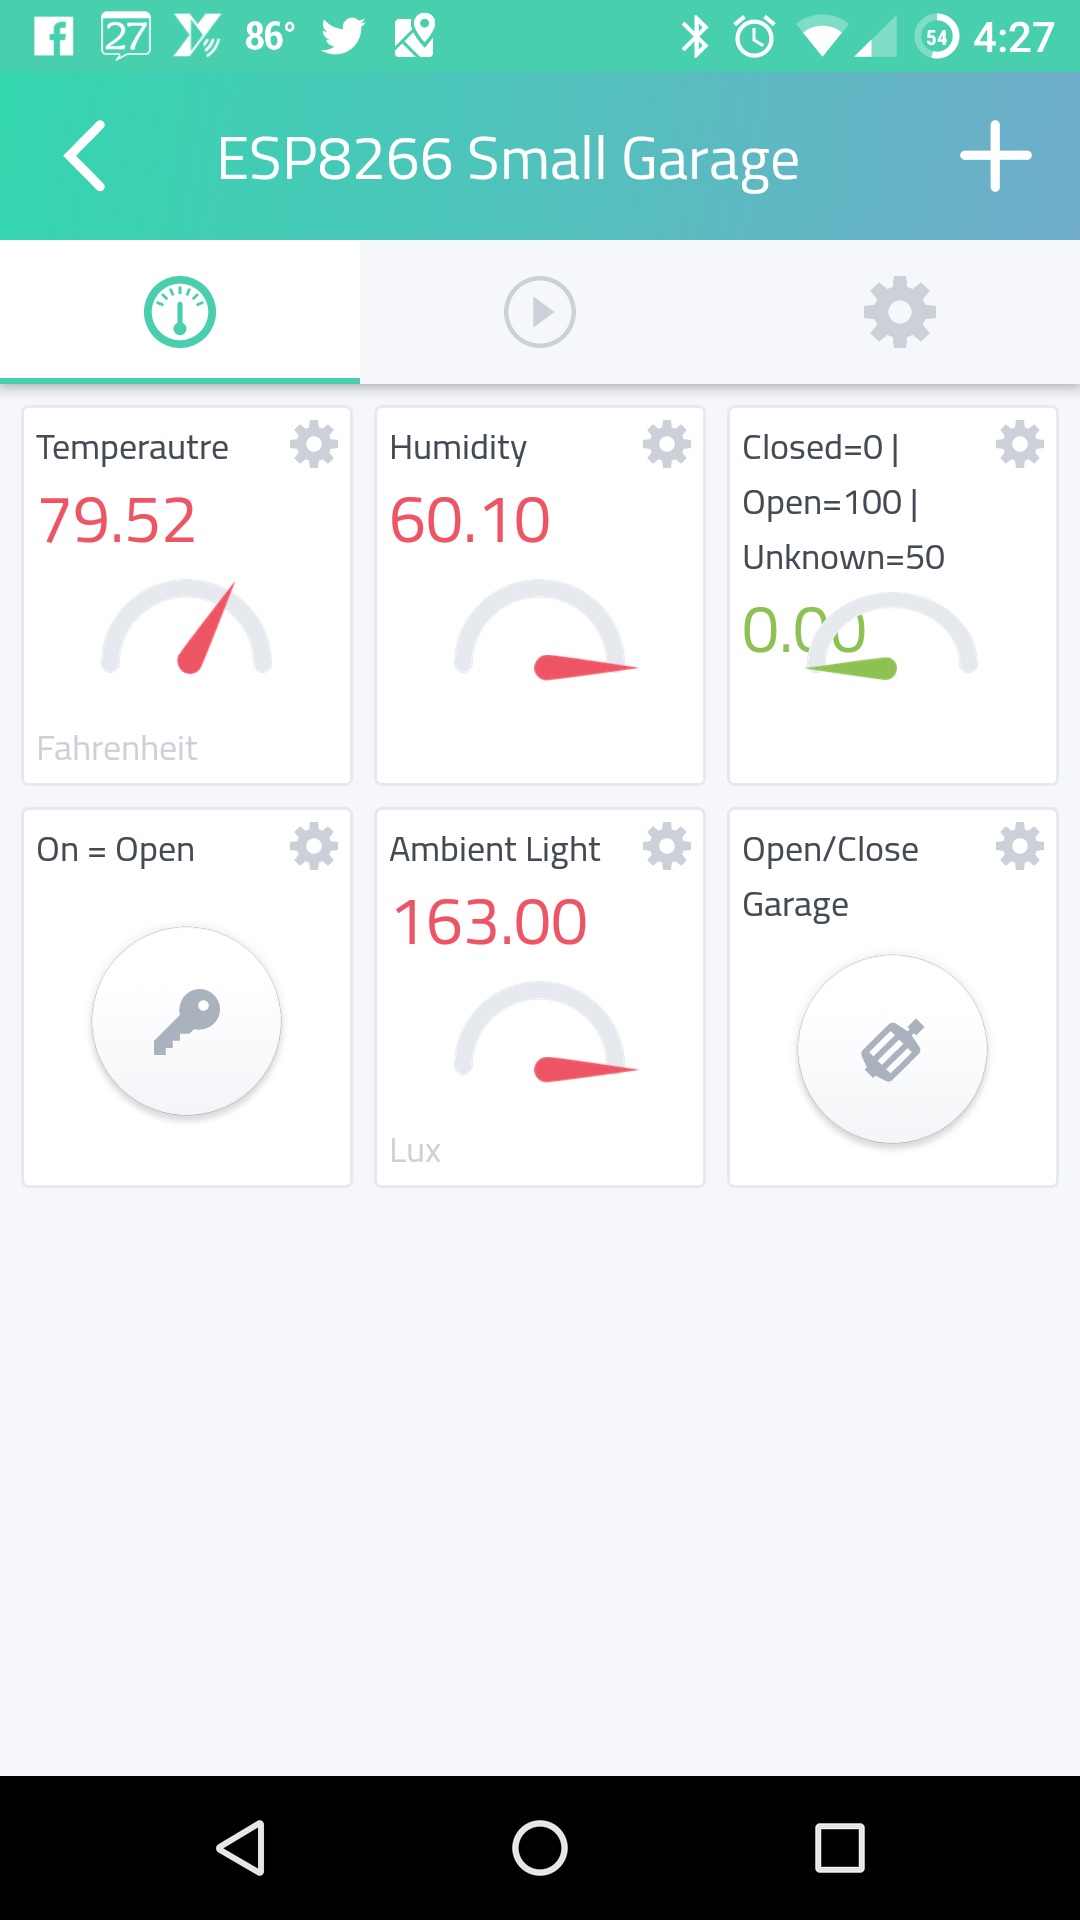
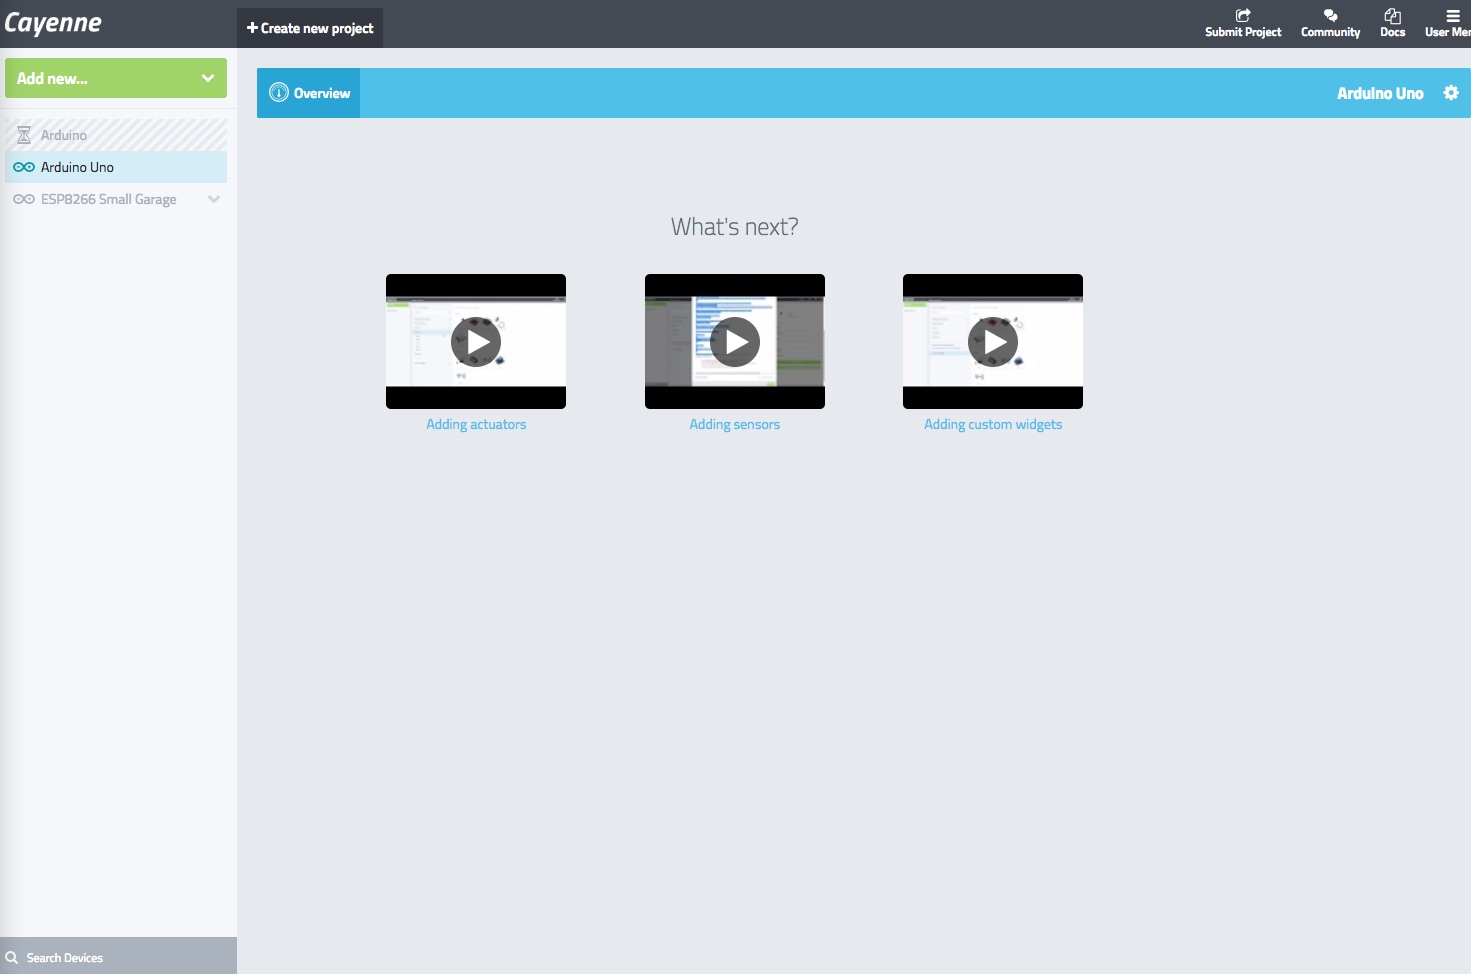
Once you see the “Ready”, the Cayenne Web Dashboard will change to “What’s Next” where you can start adding your Devices – Custom Widgets. You can also click on the Setting Gear Icon and rename the Device to ESP8266 Garage or whatever you like.
Here is a quick walk through video of how to do this(sorry my audio wasn’t recording):
Code improvements and/or questions are always welcome!
Here is the Fritzing Sketch:
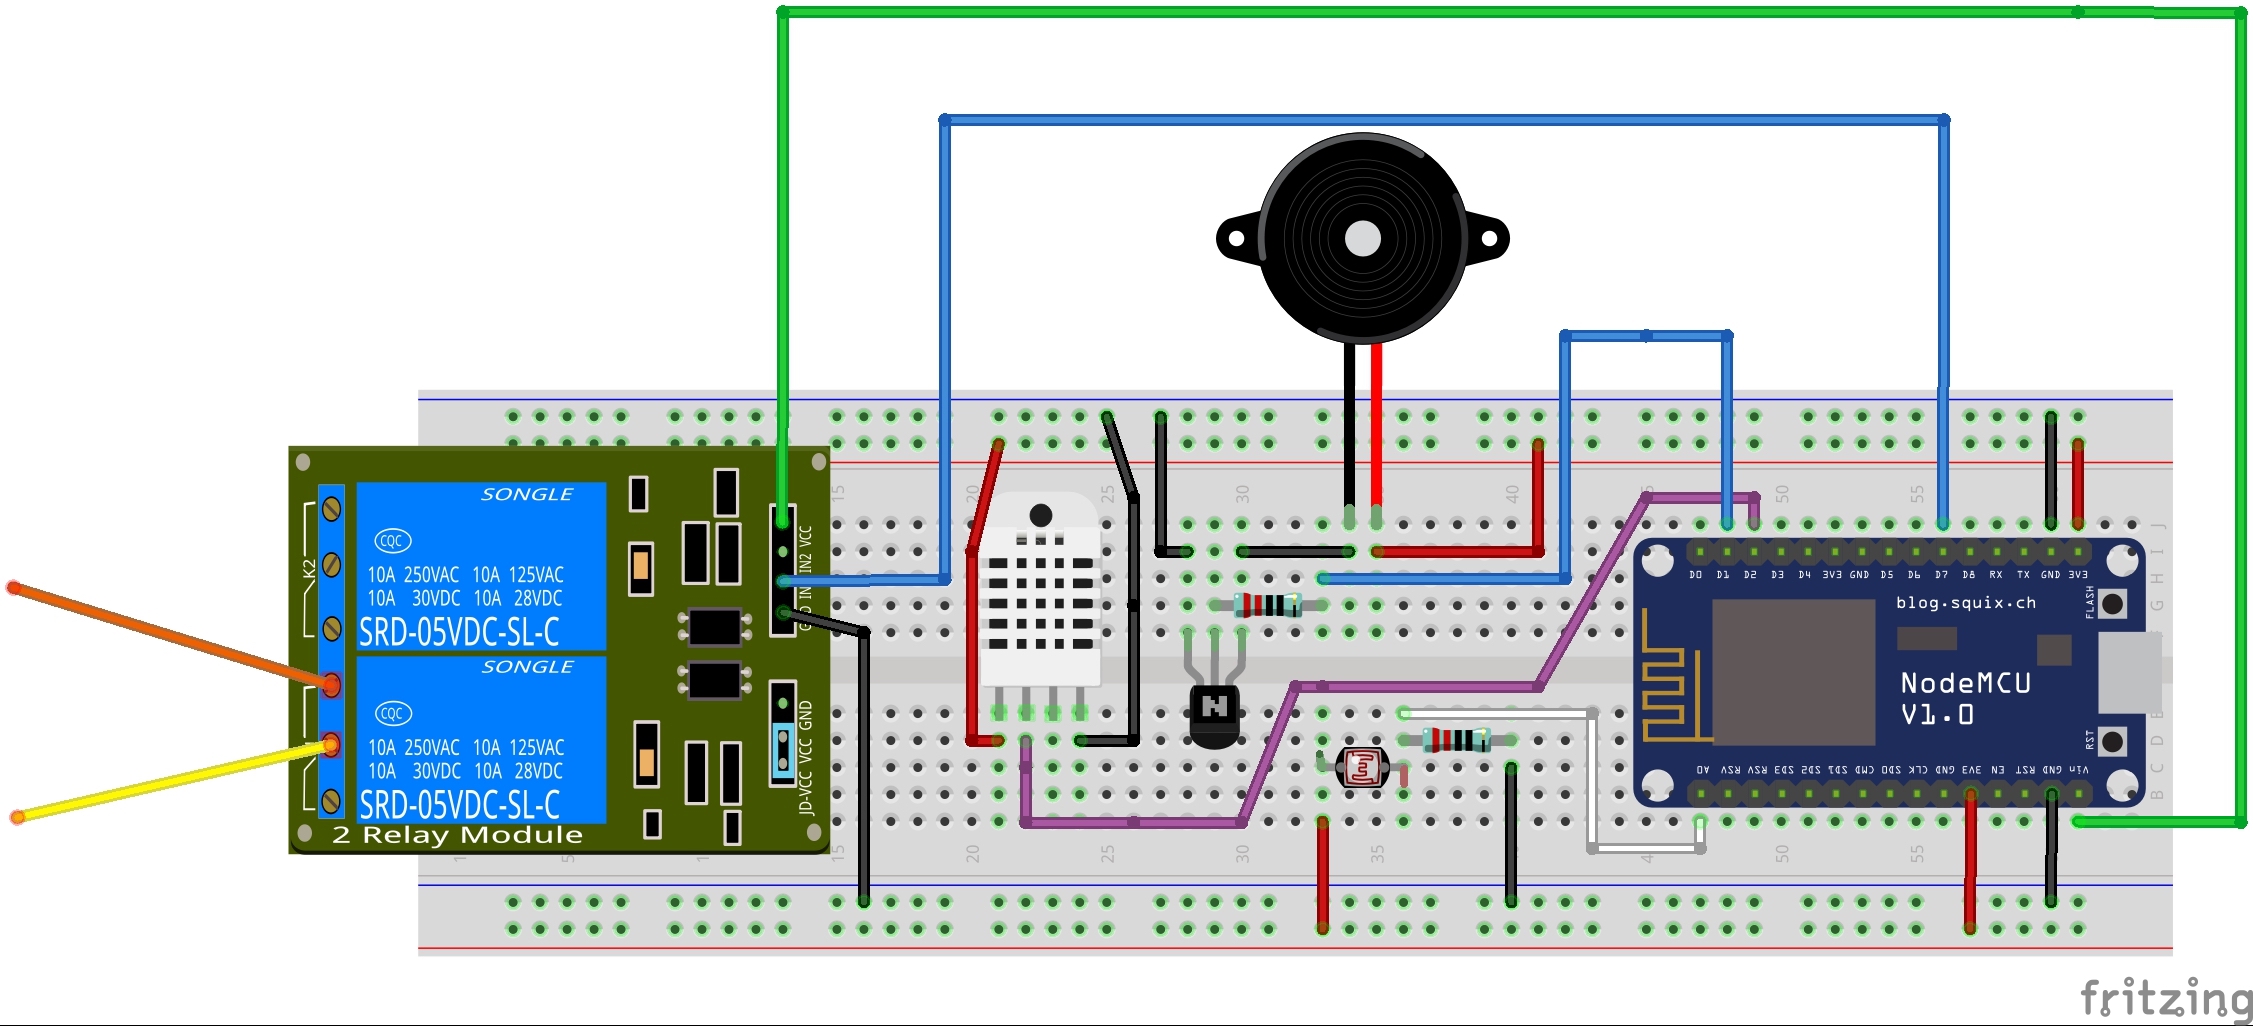
You’ll need to parallel the two wires coming from your Garage Door button into the relay Normally Opened ports. On my Marantec Opener, shorting these two wires quickly (less than 75ms) turns the opener light on or off(I found this out by accident!) I use that in my code to blink the light with the buzzer as a warning that the Garage Door is about to close:
for (i = 0; i <15; i++)
      {
      digitalWrite(13, LOW); // GPIO13 Closes Relay
      digitalWrite (buzzer, LOW) ; // Turn buzzer ON
      delay (75) ;// Delay 75ms to turn Garage Door Light Onn/Off
      digitalWrite(13, HIGH);
      digitalWrite (buzzer, HIGH) ;// turn buzzer OFF
      delay (150) ;// delay 150ms
      }
OpenHab Settings
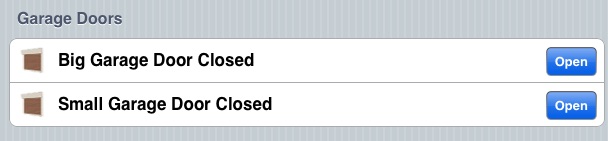

Here are the garage settings for my default.items file:
Switch SmallGarageDoorSwitch "Small Garage Door" (Garages) { mqtt=">[mosquitto:sm_garage/relay1:command:ON:OPEN],>[mosquitto:sm_garage/relay1:command:OFF:CLOSE]" }
Number SmallGarageTemp "Small Garage Temp [%.1f °F]" (Garages) { mqtt="<[mosquitto:sm_garage/temperature:state:default]" }
Number SmallGarageHumid "Small Garage Humid [%.1f %%]" (Garages) { mqtt="<[mosquitto:sm_garage/humidity:state:default]" }
And here are the settings for the default.sitemap:
Switch item=SmallGarageDoorSwitch icon="garagedoor-closed" label="Small Garage Door Closed" visibility=[ZONE17_GENERAL_STATUS=="CLOSED"] mappings=[ON="Open"]
Switch item=SmallGarageDoorSwitch icon="garagedoor-open" label="Small Garage Door Open" visibility=[ZONE17_GENERAL_STATUS=="OPEN"] mappings=[OFF="Close"]

Frame label="Temperature and Humidity" {
Text item=Homie1Temp icon="temperature"
Text item=Homie1Humid icon="water"
Text item=Chip1Temp icon="temperature"
Text item=Chip1Humid icon="water"
Text item=SmallGarageTemp icon="temperature"
Text item=SmallGarageHumid icon="water"
}
[ratings]
Reminder, some links in the post might be affiliate links, so I’ll make some coffee/beer/gadget/website hosting money if you buy anything. You get it at the normal price, though!
Arduino Sketch for Use Without MQTT
/*   ********************************************************************************************
          Garage Door Opener with Warning Light and Buzzer for Marantec
          using Cayenn IoT Framework - No MQTT
          Author: Rich Plakas / Austin, TX - USA
          Reviewed: November 1, 2016
 *   ********************************************************************************************
*/
#define CAYENNE_PRINT Serial  // Comment this out to disable prints and save space

#include <ESP8266WiFi.h>
#include "CayenneDefines.h"
#include "BlynkSimpleEsp8266.h"
#include "CayenneWiFiClient.h"

#include <Wire.h>
#include <DHT.h>
#define DHTTYPE DHT22
#define DHTPIN 4
#define VIRTUAL_PIN V1
#define VIRTUAL_PIN V2
#define VIRTUAL_PIN V3
#define VIRTUAL_PIN V4
#define VIRTUAL_PIN V5
#define VIRTUAL_PIN V6
#define REST 1000    //Rest Between Inhalations.

int lightPin = 0;  //define a pin for Photo resistor
int buzzer = 5 ;// connect the I/O pin on the buzzer to this

DHT dht(DHTPIN, DHTTYPE, 20);
float humidity, temp_f;  // Values read from sensor - See more at: http://www.esp8266.com/viewtopic.php?f=29&t=8746#sthash.X8sbMBjM.dpuf

// Generally, you should use "unsigned long" for variables that hold time
unsigned long previousMillis = 0;
unsigned long lastTempUpdate = 0;
const long interval = 5000;

// Cayenne authentication token. This should be obtained from the Cayenne Dashboard.
char token[] = "Enter Your Auth Token Here";

// Your network name and password.
char ssid[] = "Enter Your Access Point Name";
char password[] = "Enter Your Access Point Password";

int value = 0;
int gState = 0;
long rssi;
IPAddress ip;

void setup()
{
  digitalWrite(13, HIGH); //GPIO13
  pinMode(13, OUTPUT);       // Pin connected to the Relay
  digitalWrite(5, HIGH); //GPIO5
  pinMode(buzzer, OUTPUT);       // Pin connected to the Buzzer
  Serial.begin(230400);
  Cayenne.begin(token, ssid, password);
  dht.begin();
  Serial.print("Setup Gstate:");
  Serial.println(gState);
}


// ==============( Void Loop  ) ====================================

void loop() {
  Cayenne.run();
  unsigned long now = millis();
  if ( now - lastTempUpdate > 60000 ) {
    String MyIp;
    String Both;
    MyIp =  "IP: " + String(WiFi.localIP()[0]) + "." + String(WiFi.localIP()[1]) + "." + String(WiFi.localIP()[2]) + "." + String(WiFi.localIP()[3]);
    String MyWiFi;
    MyWiFi = "WiFi: " + String(WiFi.RSSI());
    Serial.println(MyIp);
    Serial.println(MyWiFi);
    gettemperature();
    Serial.print("Sending temperature:");
    Serial.println(temp_f);
    Serial.print("Sending humidity:");
    Serial.println(humidity);
    lastTempUpdate = now;
    switch (gState) {
       case 1:
       Cayenne.virtualWrite(V4, 100);
       break;
       case 2 :
       Cayenne.virtualWrite(V4, 0);
       break;
       default:
       Cayenne.virtualWrite(V4, 50);
       break;
    }
  }

}

void gettemperature() {
  // Wait at least 2 seconds seconds between measurements.
  // if the difference between the current time and last time you read
  // the sensor is bigger than the interval you set, read the sensor
  // Works better than delay for things happening elsewhere also
  /*unsigned long currentMillis = millis();

  if(currentMillis - previousMillis >= interval) {
    // save the last time you read the sensor
    previousMillis = currentMillis;   */

    // Reading temperature for humidity takes about 250 milliseconds!
    // Sensor readings may also be up to 2 seconds 'old' (it's a very slow sensor)
    humidity = dht.readHumidity();          // Read humidity (percent)
    temp_f = dht.readTemperature(true);     // Read temperature as Farenheight


    // Check if any reads failed and exit early (to try again).
    if (isnan(humidity) || isnan(temp_f)) {
      Serial.println("Failed to read from DHT sensor!");
      return;
    }
    String TempF;
    String Humid;
    TempF = String(temp_f);
    Humid = String(humidity);
    Cayenne.virtualWrite(V1, temp_f);
    Cayenne.virtualWrite(V2, humidity);

    int lightsensor = analogRead(lightPin);
    float voltage = lightsensor;

    Cayenne.virtualWrite(V6, voltage);
    Serial.print("Ambient Light: ");
    Serial.println(analogRead(lightPin));
    Serial.print("Luminosity: ");
    Serial.println(voltage);
}

CAYENNE_IN(V3)
{
  // get value sent from dashboard
  int currentValue = getValue.asInt(); // 0 to 1

  // assuming you wire your relay as normally open
  if (currentValue == 0) {
    digitalWrite(13, HIGH);
  } else {
    CloseGarage();
    }
}

void CloseGarage() {
  //Beep Buzzer & Flash Lights to warn about Garage Door Closing
     unsigned char i, j ;// define variables
      for (i = 0; i <12; i++)
      {
      digitalWrite (buzzer, LOW) ; // Turn buzzer ON
      delay (300) ;// Delay 300ms
      digitalWrite (buzzer, HIGH) ;// turn buzzer OFF
      delay (75) ;// delay 75ms
    }
      for (i = 0; i <15; i++)
      {
      digitalWrite(13, LOW); // GPIO13 Closes Relay
      digitalWrite (buzzer, LOW) ; // Turn buzzer ON
      delay (75) ;// Delay 75ms to turn Garage Door Light Onn/Off
      digitalWrite(13, HIGH);
      digitalWrite (buzzer, HIGH) ;// turn buzzer OFF
      delay (150) ;// delay 150ms
      }
      delay(1500);
      Serial.println("Closing Garage!");
      digitalWrite(13, LOW); //Close Relay = Close Garage Door
      delay(750);
      digitalWrite(13, HIGH);
}

void OpenGarage() {
      Serial.println("Opening Garage!"); //
      digitalWrite(13, LOW); //Close Relay = Close Garage Door
      delay(750);
      digitalWrite(13, HIGH);
}